Visceral fat is the hidden threat most people never see coming. Unlike the soft layer of fat you can pinch around your waist, visceral fat is buried deep inside your abdominal cavity — silently wrapping itself around your liver, pancreas, and intestines. It doesn’t always show up dramatically on the scale, and it doesn’t always produce an obvious belly. But make no mistake: excess visceral fat is one of the most powerful predictors of early death, cardiovascular disease, type 2 diabetes, and cognitive decline currently known to medicine.
According to a 2024 analysis published in Nature Medicine, individuals with high visceral fat volume face a 34% greater risk of all-cause mortality compared to those with normal levels — independent of overall body weight. You can be clinically “normal weight” and still be metabolically sick.
The encouraging news? Visceral fat is also the most metabolically responsive fat in your body. It is the first to go when you apply the right interventions consistently. This guide breaks down exactly how to lose visceral fat using the mechanisms that science has validated — covering insulin dynamics, exercise strategy, fasting protocols, and the hormonal realities of aging.
What Makes Visceral Fat So Dangerous
Most people treat body fat as a passive storage system. Visceral fat is anything but passive.
Unlike subcutaneous fat, visceral adipose tissue functions as an active endocrine organ. It secretes pro-inflammatory cytokines — including TNF-alpha, IL-6, and resistin — that travel directly through the portal vein to the liver, triggering systemic inflammation and disrupting insulin signaling at the cellular level.
This is why visceral fat is categorically different from fat stored elsewhere:
It impairs liver function by flooding hepatic tissue with free fatty acids
It elevates LDL cholesterol and lowers HDL, accelerating arterial plaque formation
It promotes chronic low-grade inflammation, a root driver of cancer, neurodegeneration, and autoimmune disease
It disrupts hormonal balance, interfering with leptin, adiponectin, and cortisol regulation
A 2025 large-scale cohort study from the Mayo Clinic confirmed that waist-to-height ratio — a proxy for visceral fat — outperforms BMI as a predictor of metabolic syndrome in adults over 40.
The takeaway is simple: reducing visceral fat is not a cosmetic goal. It is a clinical priority.
The Insulin-Visceral Fat Feedback Loop
To understand how to lose visceral fat, you must first understand why it accumulates in the first place. At the center of the problem is insulin resistance — and the two conditions reinforce each other in a damaging cycle.
How Insulin Resistance Develops
Insulin is the hormone that acts as a “key,” unlocking cells so they can absorb glucose from the bloodstream. When cells are repeatedly flooded with glucose — from a diet high in refined carbohydrates and added sugars — they begin to downregulate their insulin receptors. The key stops fitting the lock as well.
The pancreas responds by producing more insulin to compensate. Chronically elevated insulin then signals the body to store energy preferentially in the visceral compartment. More visceral fat generates more inflammation. More inflammation worsens insulin sensitivity. The cycle accelerates.
Hyperinsulinemia signals the body to store more visceral fat
Breaking this cycle requires simultaneous action on multiple fronts: reducing glucose spikes, improving cellular insulin sensitivity through exercise, and depleting glycogen stores through strategic fasting.
The Role of Glycogen
Your liver stores approximately 80–100 grams of glycogen — a readily available form of glucose. Your muscles store another 300–500 grams. Until these reserves are depleted, your body has little metabolic incentive to mobilize fat stores. This is why diet quality and meal timing matter as much as calorie quantity.
Metabolic Factor
Healthy Function
When Disrupted
Glucose
Primary cellular fuel
Excess causes oxidative stress and insulin pressure
Insulin
Shuttles glucose into cells
Chronically high levels block fat oxidation entirely
Glycogen
Short-term energy reserve
Full stores prevent the shift to fat burning
Visceral Fat
Minimal protective padding
Excess drives inflammation and organ dysfunction
Exercise: The Most Potent Tool for Losing Visceral Fat
Not all exercise produces equal results when the specific goal is visceral fat reduction. The research here is clear and worth understanding in detail.
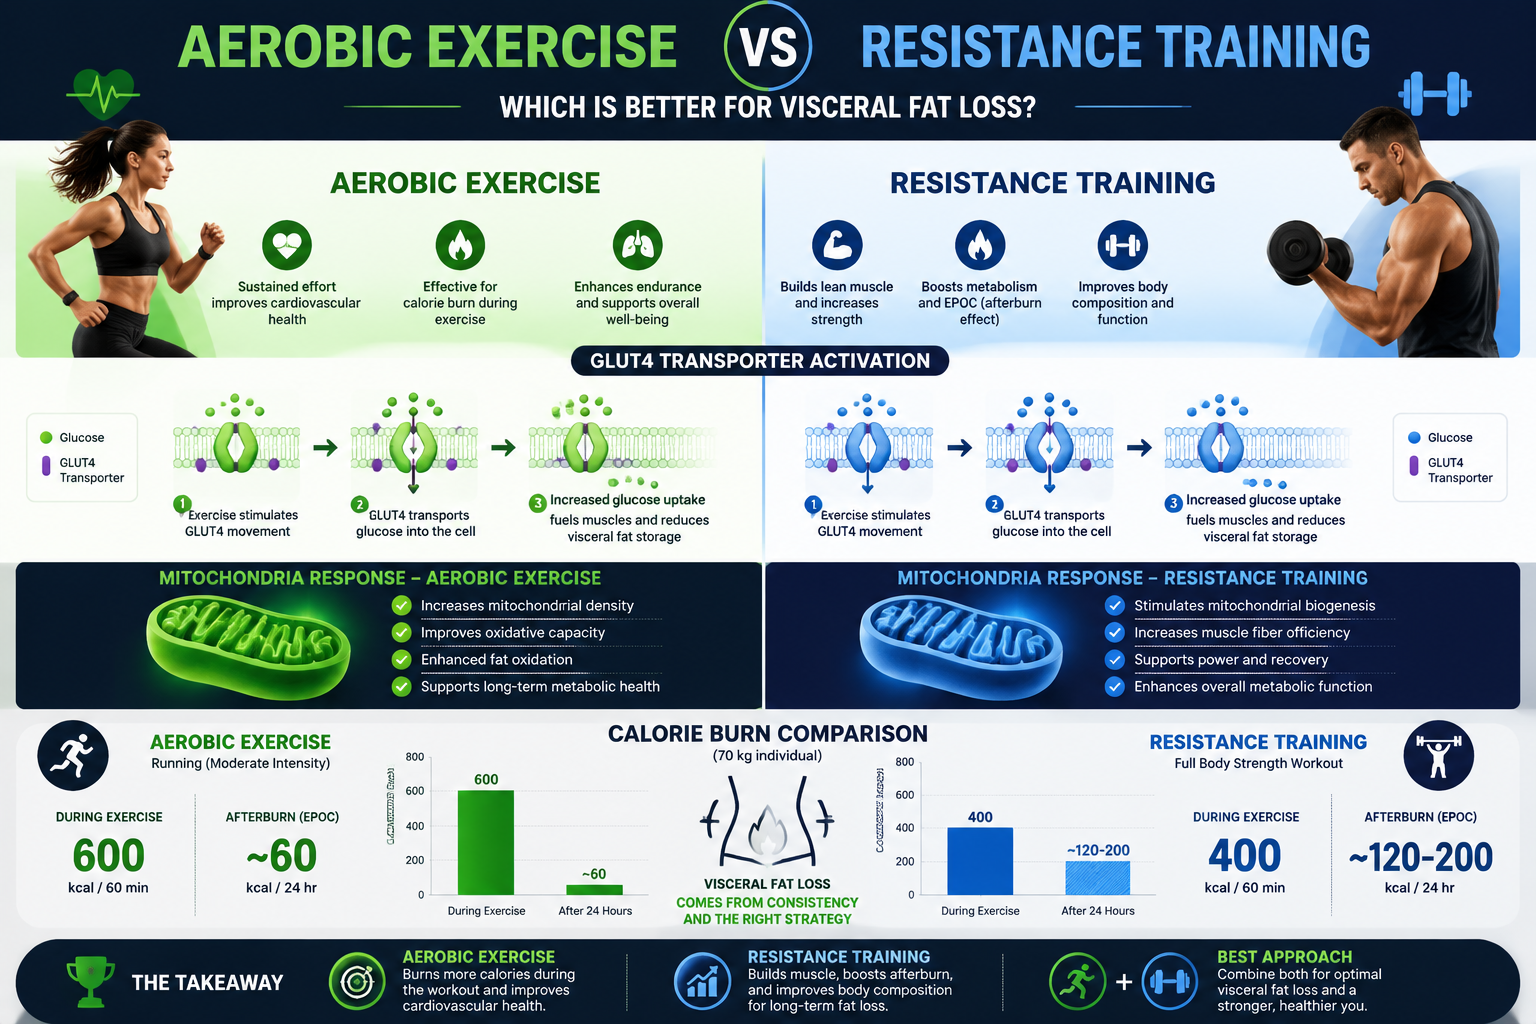
Why Aerobic Exercise Outperforms Resistance Training for Visceral Fat
A landmark 2023 meta-analysis in Obesity Reviews — covering 58 randomized controlled trials — confirmed that aerobic exercise produces significantly greater reductions in visceral adipose tissue than resistance training alone, even when total calorie burn is matched.
The mechanism is hormonal. Sustained aerobic work elevates catecholamines (epinephrine and norepinephrine), which directly stimulate lipolysis — the breakdown of fat — in visceral adipose tissue. Visceral fat has a higher density of beta-adrenergic receptors than subcutaneous fat, making it particularly responsive to this signal.
Effective aerobic modalities include:
Running or brisk walking (especially incline walking for lower-impact options)
Cycling, both outdoor and stationary
Swimming, which adds the benefit of full-body resistance
Rowing, which combines cardiovascular and muscular demand
Aim for a minimum of 150–180 minutes of moderate-intensity aerobic exercise per week, distributed across at least three sessions, to produce measurable visceral fat reduction within 8–12 weeks.
The HIIT Advantage: Speed and Insulin Sensitivity
High-Intensity Interval Training (HIIT) offers a time-efficient complement to steady-state cardio. A typical HIIT session — alternating 30–40 seconds of near-maximal effort with 60–90 seconds of recovery — activates a distinct set of adaptations:
GLUT4 upregulation: Exercise contracts muscles and triggers GLUT4 transporters to move to the cell surface, allowing glucose uptake without insulin. This directly improves insulin sensitivity for 24–48 hours post-workout.
EPOC (Excess Post-Exercise Oxygen Consumption): The metabolic “afterburn” from HIIT keeps calorie expenditure elevated for hours after the session ends.
Mitochondrial biogenesis: Repeated high-intensity bouts stimulate PGC-1alpha, a protein that drives the creation of new mitochondria — increasing your cells’ capacity to oxidize fat over time.
For individuals managing sleep deprivation — which independently causes insulin resistance — even two HIIT sessions per week have been shown to partially counteract those negative metabolic effects.
Protecting Muscle While Burning Fat
Aerobic work burns visceral fat. Resistance training protects the muscle you need to keep your metabolism elevated long-term. Both are necessary.
When operating in a caloric deficit, the body will cannibalize muscle tissue for energy if not given a reason to preserve it. Resistance training provides that signal. Combine it with adequate protein intake — 1.6 to 2.2 grams per kilogram of body weight daily — to prevent muscle loss during fat reduction phases.
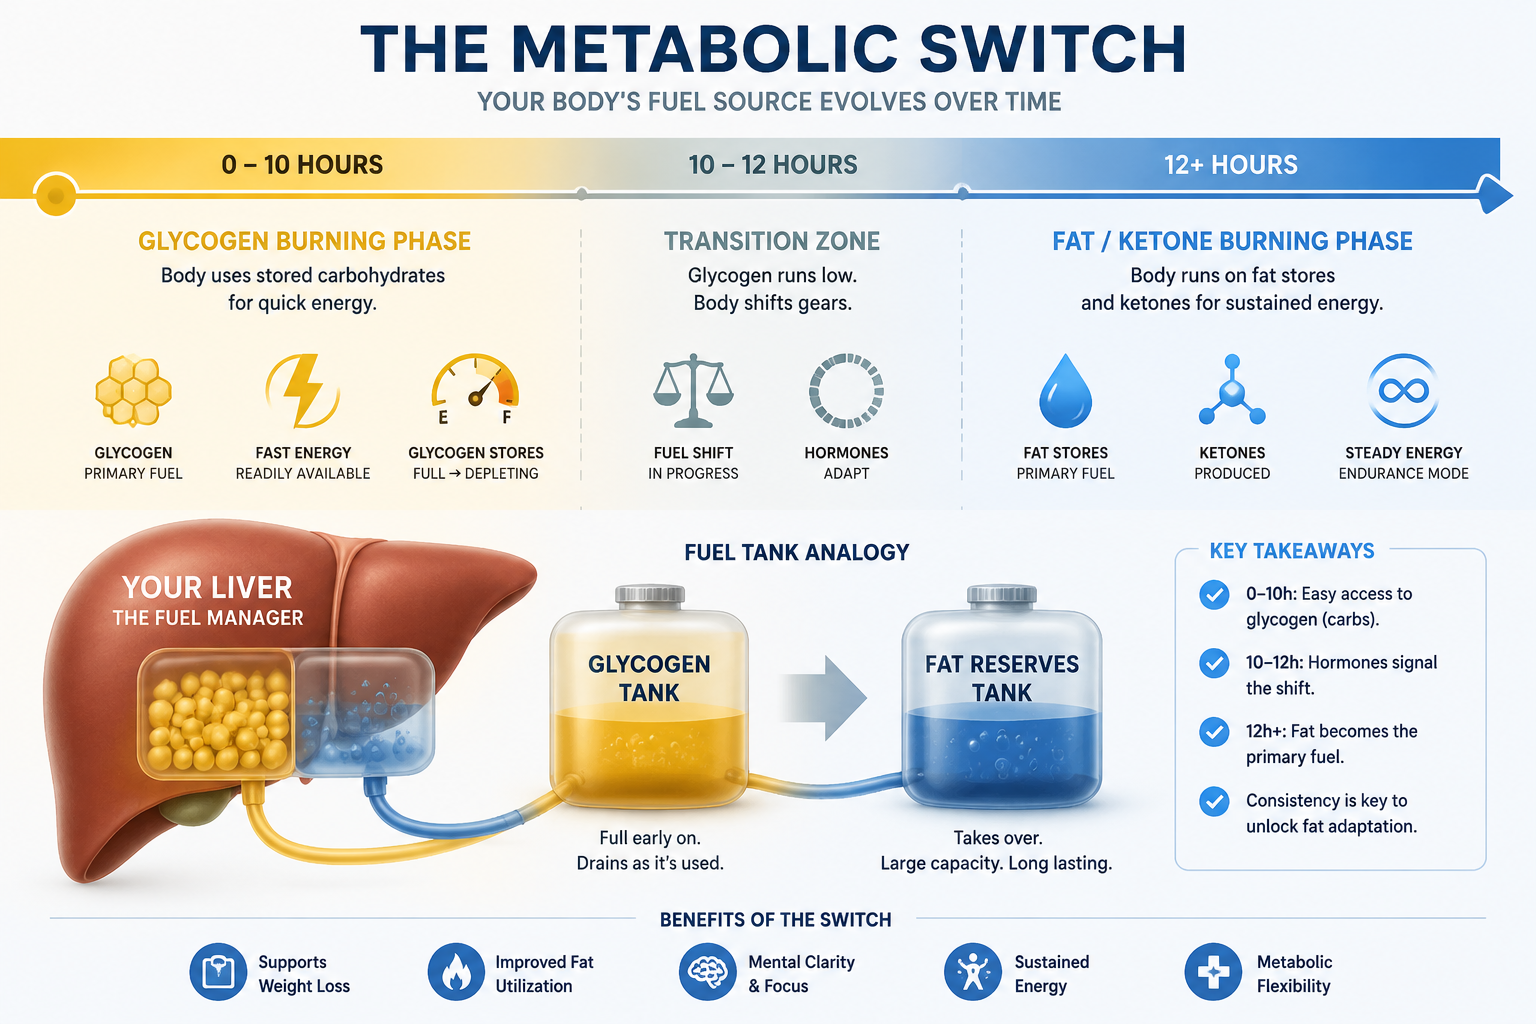
Intermittent Fasting and the Metabolic Switch
One of the most powerful strategies for how to lose visceral fat is learning to trigger what researchers call the “metabolic switch” — the physiological transition from burning glucose to burning fatty acids and ketones.
How the Switch Works
After roughly 10 to 14 hours of fasting, liver glycogen stores become sufficiently depleted that the body begins mobilizing free fatty acids from adipose tissue. The liver converts these fatty acids into ketone bodies — beta-hydroxybutyrate, acetoacetate, and acetone — which serve as an alternative fuel for the brain, heart, and muscles.
This state is not only effective for fat loss; it carries additional benefits:
Reduced neuroinflammation: Beta-hydroxybutyrate inhibits the NLRP3 inflammasome, a key driver of brain inflammation linked to Alzheimer’s disease
Improved mood and focus: Ketones increase GABA production, an inhibitory neurotransmitter that reduces anxiety and mental noise
Cellular autophagy: Fasting activates autophagy — the body’s cellular “cleanup” process — which degrades damaged proteins and organelles that accumulate during constant fed states
The 16:8 Protocol in Practice
A 16:8 intermittent fasting schedule — fasting for 16 hours and eating within an 8-hour window — is one of the most research-supported approaches for visceral fat reduction. A 2022 clinical trial in Cell Metabolism found that participants following time-restricted eating reduced visceral fat by an average of 4.3% over 12 weeks without explicitly counting calories.
Practical implementation tips:
Finish your last meal by 7–8 PM and break your fast at 11 AM–12 PM the following day
Black coffee and plain tea do not break a fast and may enhance fat oxidation during the fasting window
Ease into it — start with a 12-hour fast and extend by 30 minutes every few days if you are new to fasting
Fasted Cardio: Worth Considering
Performing aerobic exercise in the fasted state — before breaking the overnight fast — may enhance fat oxidation during the session by ensuring glycogen stores are already partially depleted. Research results are mixed, but for individuals who feel energetically capable, fasted morning cardio is a legitimate strategy. If performance suffers significantly, a small protein-only intake (20–30g) before training is a reasonable compromise.
Hormonal Realities: Why Age Makes Visceral Fat Harder to Lose
Understanding how to lose visceral fat in your 40s, 50s, and beyond requires acknowledging the hormonal environment that changes with age — for both men and women.
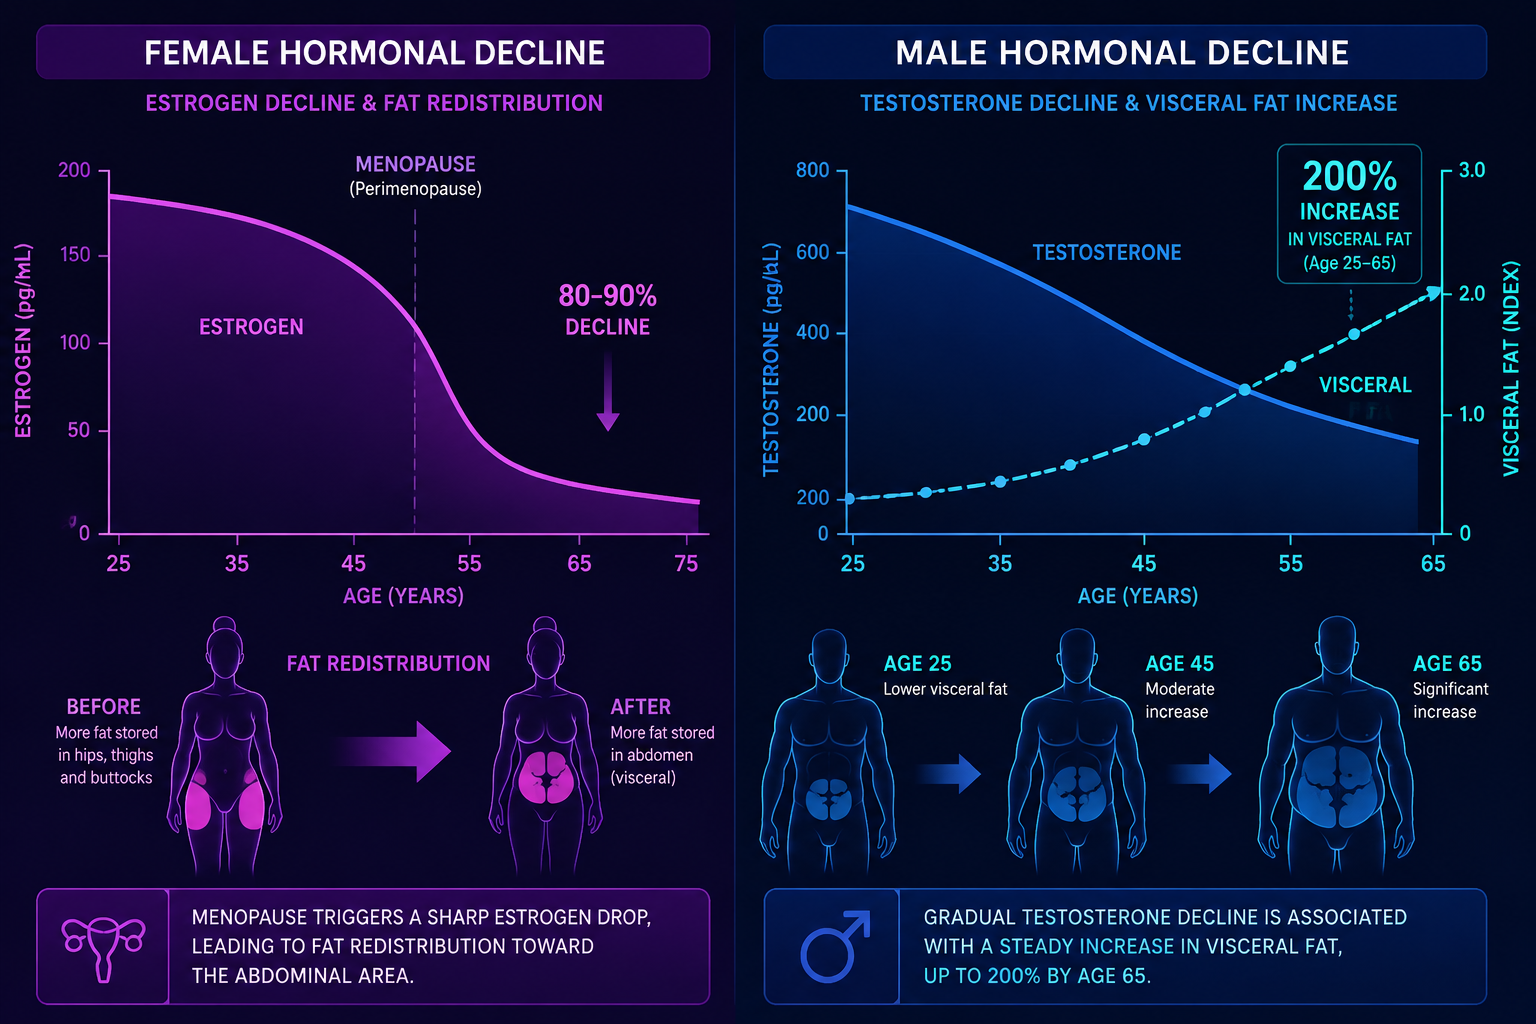
Women: The Menopause Transition
The SWAN (Study of Women’s Health Across the Nation) — one of the most comprehensive longitudinal studies of female midlife health — found that women experience an 8–10% annual increase in visceral fat beginning approximately two years before their final menstrual period.
Estrogen plays a critical role in directing fat storage toward the hips and thighs (subcutaneous). As estrogen declines during perimenopause and menopause, this directional signal disappears. Fat storage defaults to the visceral compartment. Women who were metabolically healthy in their 30s can develop significant visceral fat accumulation within just three to five years of menopause onset — without any significant change in caloric intake.
Strategies that show particular benefit for postmenopausal women include:
Higher-intensity aerobic exercise (which partially compensates for the loss of estrogen’s metabolic benefits)
Resistance training to preserve lean mass and maintain resting metabolic rate
Discussing hormone therapy options with a qualified physician, as estrogen replacement has been shown in multiple studies to attenuate visceral fat accumulation post-menopause
Men: Testosterone Decline and the 200% Problem
Men face a different but equally significant hormonal challenge. Testosterone — which facilitates fat oxidation, muscle protein synthesis, and metabolic rate — peaks in the late 20s and declines by approximately 1% per year from age 30 onward.
Research tracking men from age 25 to 65 has documented a 200% increase in visceral fat volume over that period — even in men whose total body weight remained stable. This means visceral fat can triple while the scale barely moves, a phenomenon sometimes called “weight-stable metabolic drift.”
Testosterone’s role in visceral fat metabolism is direct: it upregulates beta-adrenergic receptor sensitivity in adipose tissue and promotes lean mass retention, both of which support fat oxidation. As levels fall, these protective effects diminish.
Lifestyle interventions that support healthy testosterone levels include:
Resistance training (particularly compound lifts like squats and deadlifts)
Adequate sleep (7–9 hours; testosterone is primarily synthesized during deep sleep stages)
Zinc and vitamin D sufficiency, both of which are co-factors in testosterone biosynthesis
Stress management, since chronically elevated cortisol directly suppresses testosterone production
Your Visceral Fat Reduction Protocol: A Practical Framework
Combining all of the above into a sustainable, week-by-week approach is where most people struggle. Here is a concrete framework to start with:
Weekly Exercise Structure
Day
Activity
Duration
Monday
Aerobic (moderate intensity)
40–50 min
Tuesday
Resistance training
45 min
Wednesday
HIIT
20–25 min
Thursday
Active recovery (walking)
30 min
Friday
Aerobic (moderate intensity)
40–50 min
Saturday
Resistance training
45 min
Sunday
Rest or light movement
—
Non-Negotiable Dietary Habits
Eliminate liquid sugars entirely — sodas, fruit juices, and sweetened coffees produce rapid glucose spikes that drive the insulin-visceral fat cycle
Prioritize protein at every meal — target 30–40g per sitting to maximize muscle protein synthesis and satiety
Eat fiber-rich vegetables first — this slows glucose absorption and reduces post-meal insulin response
Limit ultra-processed foods — they are engineered to override satiety signals and consistently associate with higher visceral fat volumes in epidemiological data
Lifestyle Factors That Multiply Results
Sleep 7–9 hours per night — a single night of poor sleep (under 6 hours) raises cortisol and ghrelin, both of which promote visceral fat storage
Manage chronic stress actively — elevated cortisol is a direct driver of visceral adiposity, even in a caloric deficit
Track waist circumference, not just weight — a waist measurement above 35 inches (women) or 40 inches (men) is a clinical risk threshold worth monitoring monthly
The Bottom Line
Visceral fat is dangerous, pervasive, and largely invisible — but it is not inevitable. The science is unambiguous: aerobic exercise, time-restricted eating, insulin sensitivity training, and hormonal awareness form the most evidence-based combination for reducing visceral fat efficiently.
Start with what you can control today. Extend your overnight fast to 12 hours. Add three aerobic sessions to your week. Eliminate liquid sugar. These are not dramatic interventions — but applied consistently over 8 to 12 weeks, they produce measurable, clinically meaningful reductions in the fat that matters most.
Your organs are worth the effort.
This article references insights from Dr. Rhonda Patrick’s research communications and incorporates peer-reviewed literature current to 2025–2026. Always consult a qualified healthcare provider before making significant changes to your diet or exercise regimen.
For millions of men, stubborn chest fat — often called “man boobs” — is a source of profound frustration and quiet insecurity. The standard fitness script is predictable: do more bench presses, grind through cable flyes, slash your calories, and log endless hours on the treadmill.
Yet after months of disciplined execution, many men look in the mirror and see the exact same soft, puffy chest staring back at them. Their shirts still fit awkwardly. Their confidence stays buried. And they are left asking one question: What am I doing wrong?
The answer is both frustrating and liberating: stubborn chest fat is rarely a chest problem — it is a systemic hormonal problem.
When you attack a biochemical imbalance using purely mechanical tools like chest isolation exercises, you are fighting the wrong battle entirely. To permanently flatten your chest and reclaim a masculine physique, you must understand the biological switches that govern male fat distribution — and learn how to flip them.
This comprehensive guide breaks down the precise science behind how to get rid of chest fat. It covers the hormonal mechanisms driving fat storage, the nutritional strategies that restore insulin sensitivity, and the exercise and lifestyle protocols that permanently interrupt the cycle — backed by peer-reviewed research and updated with the most current data available in 2026.
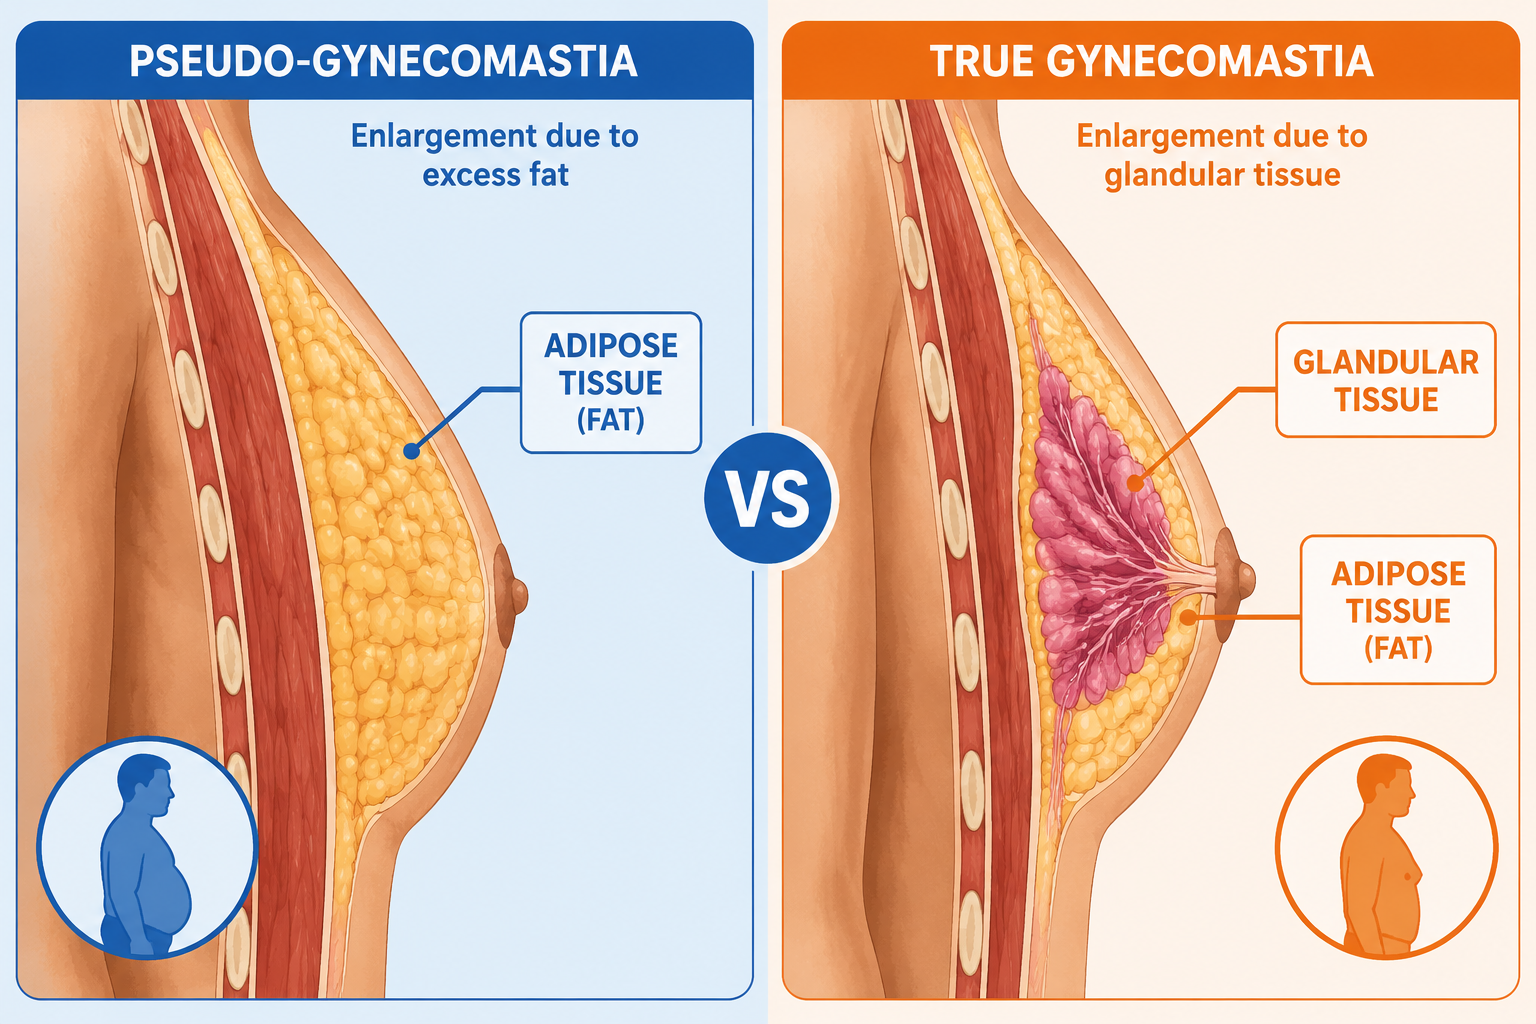
1. Pseudo-Gynecomastia vs. True Gynecomastia: Know Your Enemy
![Split medical diagram showing pseudo-gynecomastia vs true gynecomastia cross-section, clean infographic style, labeled adipose tissue and glandular tissue, blue and orange color scheme]
Before deploying any strategy, you need to understand exactly what type of tissue you are dealing with. Chest fat in men manifests in two distinct forms, and each one requires a fundamentally different understanding of biology.
Pseudo-Gynecomastia: The Fat-Only Form
Pseudo-gynecomastia is characterized by an accumulation of excess subcutaneous adipose tissue — plain fat — across the pectoral region. There is no underlying structural abnormality or significant hormonal pathology at play. It is simply the byproduct of carrying a high overall body fat percentage.
Key characteristics include:
Soft, uniform texture across the entire chest without a distinct lump behind the nipple
No tenderness or sensitivity when the chest is pressed
Proportional reduction when overall body fat drops through a sustained caloric deficit
Symmetrical appearance on both sides of the chest
If you have pseudo-gynecomastia, the path forward is clearer — though not necessarily easy. As your total body fat percentage descends, your chest will shrink along with it. The hormonal optimization strategies in this guide will dramatically accelerate that process.
True Hormonal Gynecomastia: The Glandular Form
True gynecomastia is a different beast entirely. It is driven by a profound disruption in the systemic ratio of circulating testosterone to estrogen. While it commonly emerges during puberty, it increasingly affects men over 30 — and by 2026, research from the Journal of Clinical Endocrinology and Metabolism estimates that up to 36% of men over age 40 show measurable signs of clinical gynecomastia, up from 27% a decade ago.
True gynecomastia involves the proliferation of actual glandular breast tissue directly behind the nipple. Distinguishing features include:
A firm, rubbery disc or lump palpable directly beneath the nipple
A distinct “puffy nipple” appearance that persists even at lower body fat levels
Localized tenderness or sensitivity when pressure is applied
A soft, saggy chest structure that does not respond to diet or exercise the way surrounding body fat does
Often asymmetrical, with one side more pronounced than the other
Critical note: True gynecomastia that does not respond to lifestyle intervention warrants a visit to an endocrinologist. Certain medications — including anabolic steroids, anti-androgens, some antidepressants, and proton pump inhibitors — are documented causes. A full hormonal blood panel is essential before assuming lifestyle changes alone will resolve the condition.
Understanding which form you are dealing with determines your entire strategy. Most men battling persistent chest fat are caught somewhere on the spectrum between the two — carrying excess subcutaneous fat while simultaneously managing a hormonal environment that makes that fat nearly impossible to shift without targeted intervention.
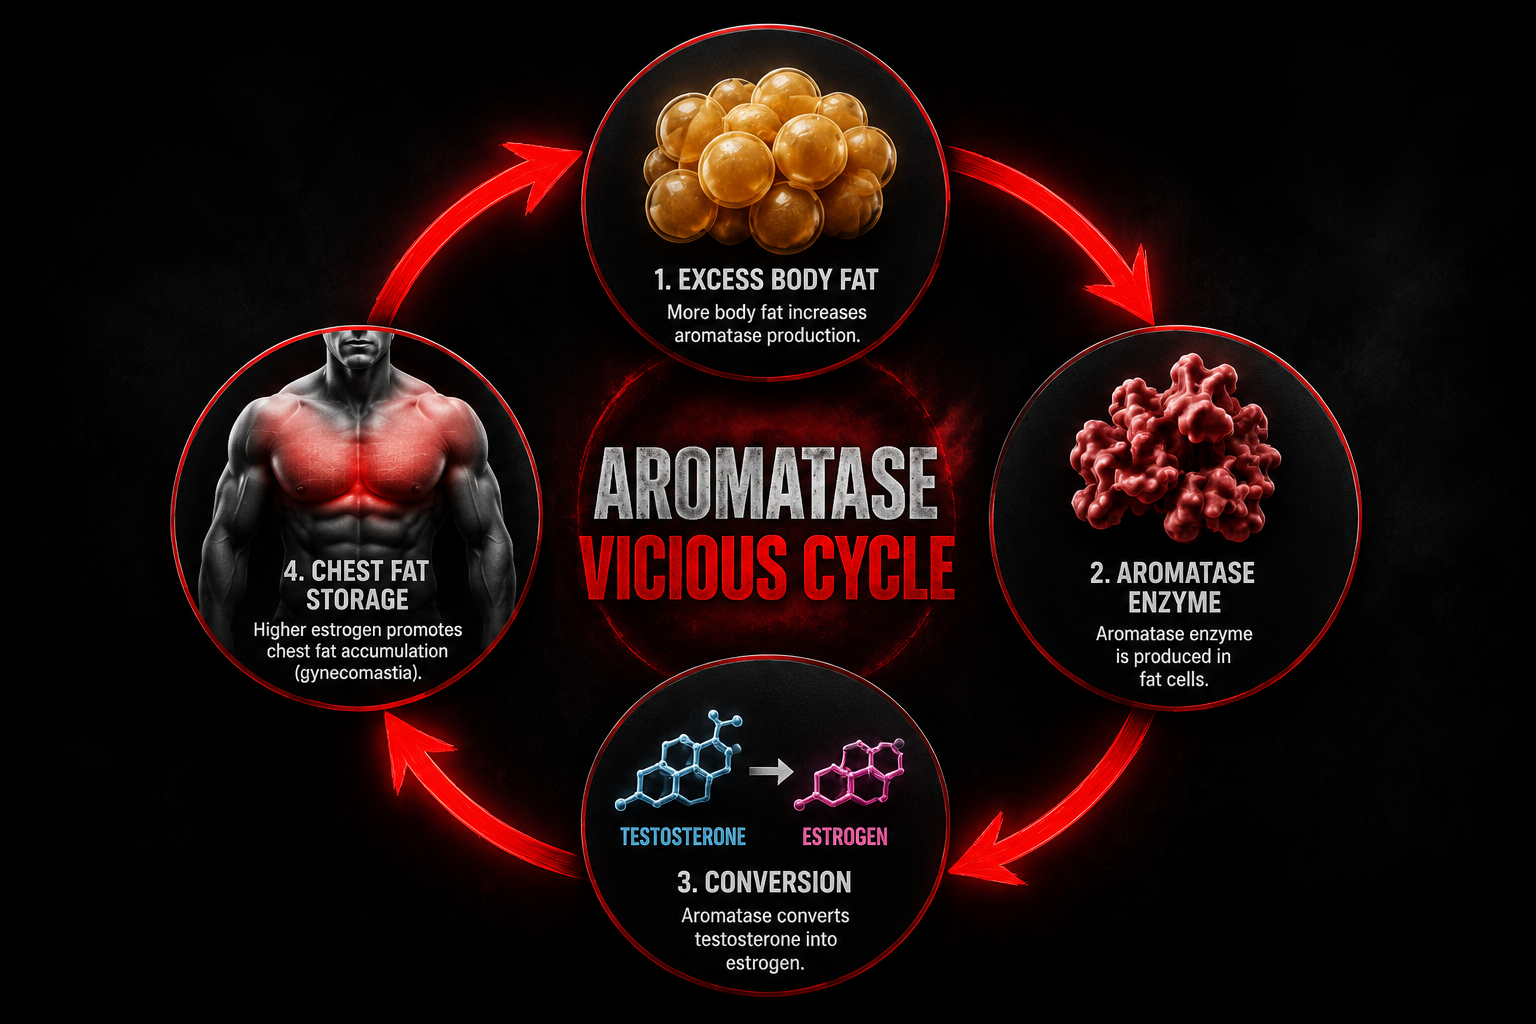
2. The Biochemical Trap: The Aromatase Vicious Cycle
![Circular flowchart infographic showing the Aromatase Vicious Cycle: body fat → aromatase enzyme → testosterone to estrogen conversion → chest fat storage → loop back, dark background with red arrows]
To understand why chest fat is so stubborn, you need to examine how testosterone and estrogen interact inside the male body — and how easily that balance tips in the wrong direction.
In a healthy man in his twenties, testosterone is the dominant androgen. It keeps estrogen tightly regulated, maintains lean muscle mass, and governs where the body prefers to store or burn fat. However, after crossing the threshold of age 30, natural testosterone production begins a steady, unrelenting decline of approximately 1% to 2% per year, as documented in the Journal of Clinical Endocrinology and Metabolism.
A 1% annual decline sounds manageable in isolation. The problem accelerates exponentially because of one enzyme: aromatase.
What Is Aromatase?
Aromatase is the enzyme responsible for the biosynthesis of estrogen in men. It resides predominantly in adipose tissue — specifically the visceral fat surrounding your organs and the subcutaneous fat concentrated on your chest and hips. A landmark study published in the Journal of Steroid Biochemistry and Molecular Biology demonstrated that aromatase activity in fat tissue scales up dramatically as body fat percentage rises.
The result is a self-reinforcing biochemical trap that works like this:
Step 1 — Excess Fat Increases Aromatase Volume Carrying above-average body fat means you are housing a larger volume of aromatase enzymes throughout your adipose tissue.
Step 2 — Aromatase Converts Testosterone Into Estrogen These excess enzymes aggressively intercept circulating testosterone molecules and chemically convert them into estradiol — the primary form of estrogen.
Step 3 — Elevated Estrogen Signals Preferential Fat Storage Rising estrogen levels send a powerful hormonal signal to deposit more fat in estrogen-sensitive areas: the chest, nipples, and hips.
Step 4 — New Chest Fat Generates More Aromatase The newly deposited chest fat houses additional aromatase enzymes, which further accelerate the testosterone-to-estrogen conversion.
The loop closes — and tightens with every cycle.
Why Traditional Methods Fail Inside This Loop
This is the core reason why chest presses and aggressive cardio fail to solve the problem. A severe caloric deficit or excessive endurance training in this hormonal environment does not preferentially target estrogen-dominant fat zones. Instead, the body — already cortisol-elevated and testosterone-suppressed — preferentially catabolizes lean muscle tissue while stubbornly protecting the chest fat that is being actively maintained by elevated estrogen.
You are not failing because of a lack of effort. You are failing because you are using mechanical tools to solve a biochemical problem.
Breaking the aromatase cycle requires interrupting the chemical signals at their source — which is exactly what the three pillars outlined in this guide are designed to do.
3. The Insulin Connection: The Hormonal Lock on Fat Burning
The second major hormonal driver of stubborn chest fat is chronic insulin elevation, clinically referred to as hyperinsulinemia. Understanding this mechanism is non-negotiable for anyone serious about learning how to get rid of chest fat permanently.
How Insulin Blocks Fat Burning
Insulin is a highly anabolic storage hormone secreted by the pancreas in response to rising blood glucose. When you eat carbohydrates or sugars, blood glucose rises, and insulin is released to ferry that glucose into your cells for energy or storage.
In a metabolically healthy person, this is a clean, efficient process. The problem is modern lifestyle habits — ultra-processed foods, constant snacking, chronic stress, and poor sleep — keep insulin levels chronically elevated throughout the day.
When insulin is elevated, your body is locked into a strict metabolic state of storage. Specifically:
Lipolysis is completely halted. The enzyme hormone-sensitive lipase (HSL), which breaks down stored fat for fuel, is directly inhibited by insulin. You cannot burn chest fat when insulin is high — full stop.
Fat synthesis is accelerated. Elevated insulin activates lipoprotein lipase (LPL) in fat cells, actively directing circulating fatty acids into storage.
Glucose oxidation dominates. Your body burns glucose as its primary fuel source, never reaching the point of tapping into stored body fat.
The Testosterone-Suppressing Effect of High Insulin
The damage extends well beyond simple fat storage. Research published in Diabetes Care revealed that chronically elevated insulin directly suppresses testosterone production by disrupting the hypothalamic-pituitary-gonadal (HPG) axis — the hormonal command chain that signals the testes to produce testosterone.
Simultaneously, hyperinsulinemia amplifies the expression and activity of aromatase within fat cells, directly accelerating the testosterone-to-estrogen conversion described in the previous section.
The compounding effect is devastating:
High insulin prevents your body from burning existing chest fat
High insulin lowers your testosterone production
High insulin amplifies aromatase activity, converting remaining testosterone into estrogen
Elevated estrogen signals more fat storage on the chest
This is why insulin control is not optional — it is the foundation of every effective chest fat elimination strategy.
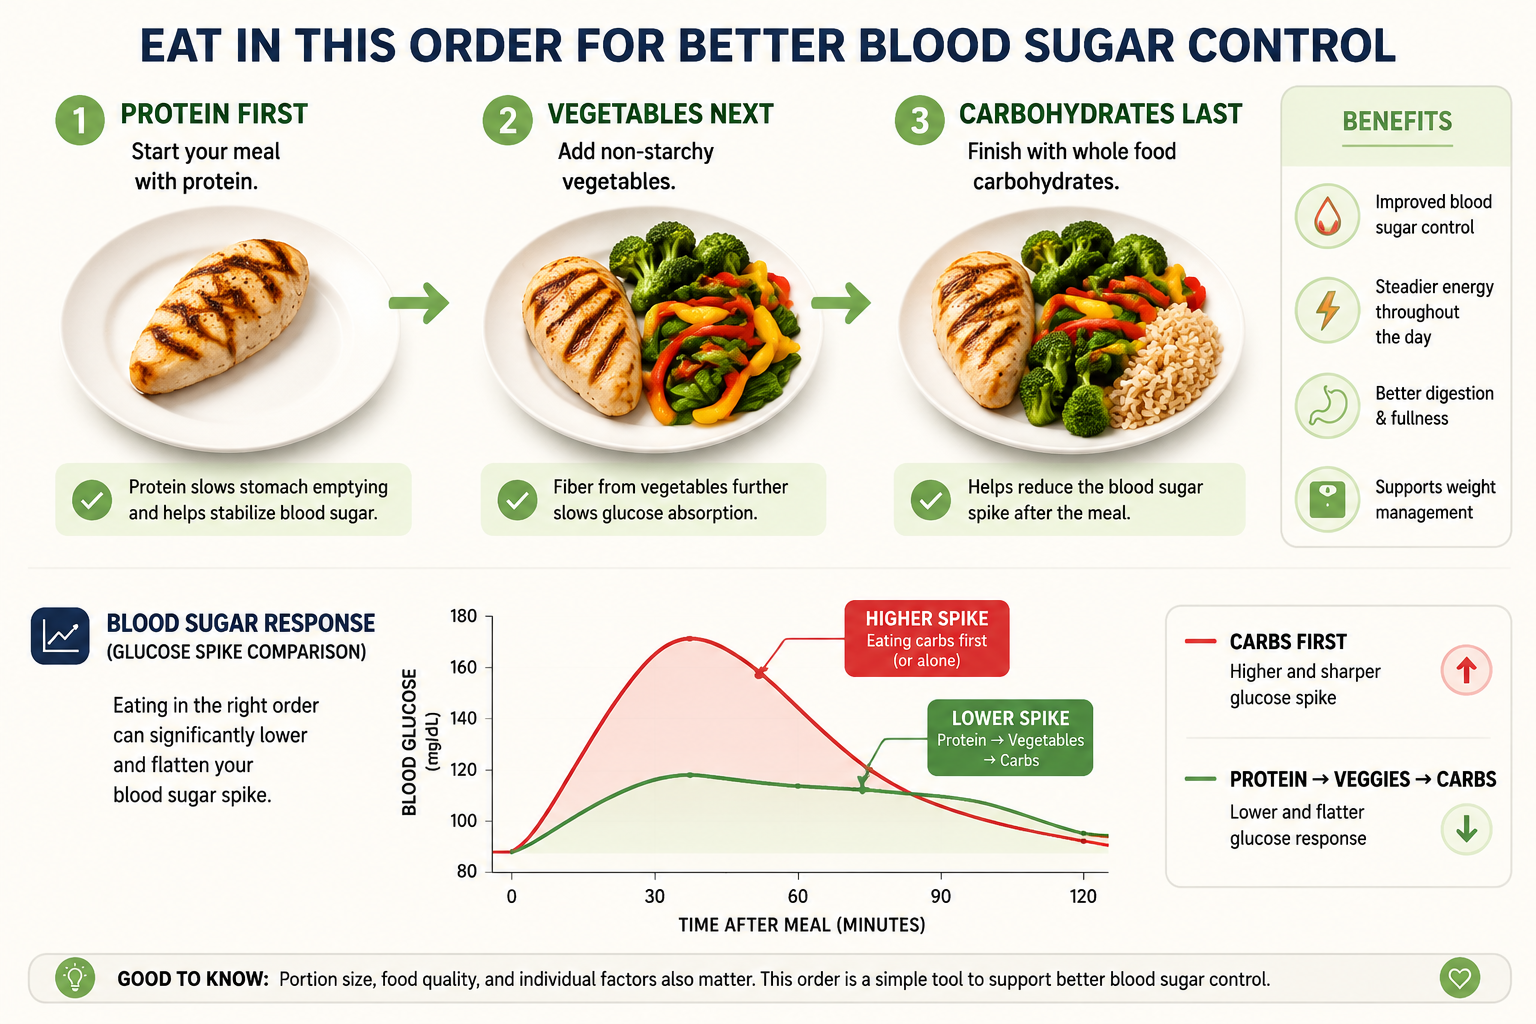
4. Pillar 1: Re-Engineering Your Insulin Response
![Step-by-step food sequencing plate infographic showing protein first, then vegetables, then carbohydrates, with glucose spike comparison graph, clean modern nutrition diagram style]
Fixing your insulin sensitivity does not require starving yourself or eliminating entire food groups. It requires strategic, evidence-based nutrition adjustments that alter the biochemical environment of your digestive tract. Here is exactly how to do it.
Strategy 1: The Food Sequencing Protocol
One of the simplest yet most powerful tools for controlling insulin is changing the order in which you eat the food on your plate. The sequence is non-negotiable:
A clinical study conducted at Stanford University and published in Diabetes Care tracked participants eating identical meals with identical caloric values but in different sequences. The findings were striking:
Eating protein and vegetables before carbohydrates reduced post-meal glucose spikes by up to 37%
The total insulin response was slashed by up to 44%
These benefits persisted across multiple meal types and were consistent regardless of overall caloric intake
The mechanism is elegant: consuming protein and fiber first coats the digestive tract and slows gastric emptying. When carbohydrates finally reach the small intestine, they are absorbed at a gradual, metered pace rather than flooding the bloodstream all at once. The result is a dramatically blunted insulin response — from the exact same meal.
Practical application:
Start every meal with 4–6 oz of protein (chicken, eggs, fish, beef)
Eat your vegetables and salad next
Only then consume rice, bread, pasta, or other starchy carbohydrates
This single habit costs nothing and requires no dietary restriction
Strategy 2: The Apple Cider Vinegar Protocol
To further fortify your insulin defense, implement a pre-meal apple cider vinegar (ACV) protocol. The mechanism is grounded in solid biochemistry, not wellness folklore.
The protocol: Mix 1 tablespoon of raw, unfiltered apple cider vinegar into a large glass of water (8–12 oz) and drink it 10–15 minutes before your two largest, most carbohydrate-dense meals of the day.
Why it works — the acetic acid mechanism:
Acetic acid, the active compound in ACV, performs two distinct biological functions simultaneously:
Alpha-glucosidase inhibition: Acetic acid temporarily inhibits the digestive enzymes in the small intestine responsible for breaking down complex starches into glucose. This slows carbohydrate absorption and flattens the glucose curve.
AMPK activation: Acetic acid activates Adenosine Monophosphate-Activated Protein Kinase (AMPK) — often described as the body’s metabolic master switch. When AMPK is activated, muscle cells become highly sensitized to insulin, allowing them to pull glucose out of the bloodstream with far less insulin assistance.
The research backing:
A study published in the Journal of Functional Foods found that consuming vinegar before a high-carbohydrate meal reduced post-meal blood glucose by 20% and suppressed the subsequent insulin spike by 19%
A separate study from Arizona State University demonstrated that consuming vinegar before bed lowered next-morning fasting blood glucose by 4% to 6%
A 2024 meta-analysis in Nutrients pooling data from 11 randomized controlled trials confirmed that regular ACV consumption produced a statistically significant reduction in fasting insulin levels across all participant groups
Less circulating insulin means the biological lock on your chest fat is progressively dismantled with every meal.
Strategy 3: Eliminate Xenoestrogens and Ultra-Processed Foods
Controlling insulin also demands a thorough audit of the chemical composition of your diet and food storage habits. Ultra-processed foods are loaded with refined seed oils, artificial additives, and high-fructose corn syrup — all of which drive insulin resistance. But there is a less-discussed threat embedded in the packaging itself.
Xenoestrogens are industrial chemicals — most notably Bisphenol A (BPA), phthalates, and parabens — that are found in plastic food containers, canned food linings, non-stick cookware coatings, and synthetic food packaging. As detailed in a comprehensive review published in Environmental Health Perspectives, these compounds possess a molecular structure that closely mimics natural estrogen.
When ingested or absorbed through the skin, xenoestrogens:
Bind directly to estrogen receptors in male tissue, triggering estrogenic responses
Signal the body to deposit fat in estrogen-sensitive areas, including the chest
Actively contribute to glandular tissue proliferation in true gynecomastia cases
Suppress testosterone production through endocrine disruption
A 2025 study published in Environmental Research found that men in the highest quartile of urinary BPA levels had testosterone levels 17% lower than men in the lowest quartile — a staggering difference attributable entirely to chemical exposure.
Practical elimination steps:
Switch to whole, single-ingredient foods as your dietary foundation
Store all meals and leftovers in glass or stainless steel containers
Never heat food in plastic containers, even those labeled “microwave-safe”
Choose fresh or frozen vegetables over canned alternatives
Filter your drinking water with a reverse osmosis or activated carbon filter
Strategy 4: Time-Restricted Eating for Insulin Reset
Time-restricted eating (TRE) — often called intermittent fasting — is one of the most well-researched tools for restoring insulin sensitivity. By compressing your eating window to 8–10 hours per day and fasting for 14–16 hours, you allow insulin levels to fully bottom out during the fasting period.
Growth hormone secretion surges (by up to 2,000% during extended fasts, per research in the New England Journal of Medicine), accelerating fat breakdown and muscle preservation
Cellular autophagy — the body’s self-cleaning process — is activated, improving metabolic efficiency
A 2024 clinical trial published in Cell Metabolism found that men following a 16:8 TRE protocol for 12 weeks experienced a 34% reduction in fasting insulin and a significant reduction in visceral fat compared to controls eating the same caloric intake across a standard eating window.
Implementation approach:
Begin your eating window at 10:00 AM or 12:00 PM
Close your eating window by 6:00 PM or 8:00 PM
Consume only water, black coffee, or plain green tea during the fasting window
Maintain consistent meal timing seven days per week for hormonal rhythm
5. Pillar 2: Eliminating Androgen Suppressors and Optimizing Testosterone
Many men jump immediately to exotic testosterone-boosting supplements when they realize hormones are the issue. This is backwards. True hormonal optimization is not about adding unproven compounds — it is about aggressively eliminating the lifestyle factors that are actively suppressing your natural endocrine system. Remove the suppressors first, then optimize.
Sleep: The Ultimate Androgen Accelerator
![Split comparison visual: man with poor sleep habits vs optimized sleep showing testosterone level bars, bedroom environment tips checklist, dark blue and gold color scheme, infographic style]
The vast majority of a man’s daily testosterone is synthesized and released overnight in rhythmic pulses during slow-wave deep sleep and REM cycles. This is not a minor detail — it is the primary mechanism of testosterone production in adult men.
If you truncate your sleep, you directly truncate your testosterone output.
A landmark study from the University of Chicago restricted healthy young men to just 5 hours of sleep per night for one week. The results were alarming:
Circulating testosterone levels crashed by 10% to 15% compared to well-rested baseline
The researchers noted this decline was equivalent to aging 10 to 15 years in a single week from an endocrine perspective
Cortisol levels simultaneously spiked, compounding the testosterone suppression
A 2025 analysis published in Sleep Medicine Reviews pooling data from 43 studies confirmed that every additional hour of sleep below 7 hours per night is associated with a measurable reduction in morning testosterone levels, with the effect becoming clinically significant below 6 hours.
Sleep optimization protocol:
Maintain a strict 7.5 to 8.5-hour sleep window — consistency of timing matters as much as duration
Cool your bedroom to 60–67°F (15–19°C); core body temperature must drop to initiate deep sleep cycles
Eliminate all blue-light-emitting screens at least 60 minutes before bed — blue light suppresses melatonin secretion and fragments REM architecture
Use blackout curtains or a sleep mask; even low-level ambient light disrupts melatonin and growth hormone release
Avoid alcohol within 3 hours of sleep — while alcohol may induce drowsiness, it devastates REM sleep quality and suppresses overnight testosterone synthesis
Correcting Micronutrient Deficiencies: Zinc and Vitamin D
Without the correct raw chemical building blocks, your Leydig cells in the testes cannot physically synthesize testosterone — regardless of how well you eat or train. Two micronutrient deficiencies are overwhelmingly prevalent in modern men and directly responsible for suppressed testosterone production.
Micronutrient
Biological Role
Target Daily Dosage
Best Sources
Zinc
Directly involved in converting cholesterol into testosterone at the cellular level; deficiency causes immediate hypogonadism
25–40 mg Zinc Citrate or Gluconate
Oysters, red meat, pumpkin seeds, pasture-raised eggs
Vitamin D3
Functions as a secosteroid hormone; binds directly to androgen receptors to stimulate testosterone synthesis
3,000–5,000 IU daily with a fatty meal
Direct sunlight, wild-caught fatty fish, quality supplementation
Magnesium Glycinate
Reduces SHBG (sex hormone-binding globulin), increasing the ratio of free, bioavailable testosterone
300–400 mg before bed
Dark leafy greens, pumpkin seeds, dark chocolate
The research is unambiguous:
A study published in Nutrition found that zinc-deficient men who supplemented daily for 6 months experienced a 74% increase in circulating testosterone — nearly doubling their baseline levels
A meta-analysis in Hormone and Metabolic Research confirmed that Vitamin D supplementation significantly elevated total and free testosterone in men with baseline deficiency (below 50 nmol/L)
A 2024 study in Biological Trace Element Research found that magnesium supplementation reduced SHBG by an average of 13% over 8 weeks, meaningfully increasing free testosterone availability
Request a comprehensive blood panel from your physician that includes total testosterone, free testosterone, SHBG, estradiol, Vitamin D (25-OH), zinc, and magnesium. Identify and correct these deficiencies before spending money on anything else.
The Cortisol Control Protocol
Cortisol is your primary stress hormone, secreted by the adrenal glands in response to psychological stress, physical overtraining, caloric restriction, and sleep deprivation. Cortisol and testosterone share an explicit, documented inverse relationship driven by a mechanism called pregnenolone steal.
Both hormones are synthesized from the same precursor molecule — pregnenolone. When your body is under chronic stress, it prioritizes cortisol production, diverting pregnenolone away from the testosterone synthesis pathway. The result is a direct, measurable reduction in testosterone output.
Research published in Hormones and Behavior found that men with chronically elevated cortisol had testosterone levels up to 20% lower than their relaxed counterparts. More critically, cortisol directly increases aromatase expression within fat tissue — meaning high stress simultaneously robs you of testosterone and accelerates its conversion into chest-fat-building estrogen.
Practical cortisol reduction strategies:
Omega-3 Fatty Acids: Integrate wild-caught fatty fish (salmon, mackerel, sardines, herring) into your diet 3–4 times per week. A study from the University of Gettysburg found that supplementing with 4 grams of fish oil daily reduced baseline cortisol levels by 19% over 6 weeks while simultaneously reducing body fat percentage. If dietary fish intake is inconsistent, supplement with a high-quality triglyceride-form omega-3 providing at least 2–3 grams of combined EPA and DHA daily.
Ashwagandha (KSM-66 extract): A double-blind, placebo-controlled trial published in the Journal of the International Society of Sports Nutrition found that men taking 600 mg of KSM-66 ashwagandha daily for 8 weeks experienced a 27.9% reduction in cortisol and a 15.4% increase in testosterone compared to placebo. This is one of the most well-replicated findings in adaptogen research.
Zone 2 Cardio (not HIIT): Contrary to popular belief, high-intensity interval training performed excessively actually elevates cortisol significantly. Moderate-intensity Zone 2 cardio — maintaining 60–70% of maximum heart rate for 30–45 minutes — has been shown to reduce cortisol and improve hypothalamic-pituitary-adrenal (HPA) axis regulation without the cortisol spike associated with maximal-effort exercise.
Avoid the Crash Diet Trap
When men want to eliminate chest fat quickly, the instinct is to slash calories aggressively. This is one of the most common and damaging biological errors in male fat loss.
Research published in the Journal of Clinical Endocrinology revealed that severe caloric restriction — defined as eating more than 40% below maintenance calories — produces the following within just 14 days:
Cortisol spikes by up to 35% system-wide
Testosterone plummets by up to 36%
Muscle protein synthesis decreases significantly, accelerating lean mass loss
Metabolic rate adapts downward through reduced thyroid hormone output
A crashed endocrine system does not burn chest fat — it protects it while consuming muscle tissue. The hormonal environment created by crash dieting is nearly identical to the hormonal environment that causes chest fat accumulation in the first place.
The correct approach:
Maintain a moderate, sustainable caloric deficit of 300 to 500 calories below your Total Daily Energy Expenditure (TDEE). This is the evidence-based sweet spot that:
Preserves testosterone and anabolic hormone output
Protects lean muscle mass
Forces consistent fat oxidation without triggering starvation adaptations
Is sustainable for the 16–24 weeks required to produce meaningful changes in stubborn fat deposits
Calculate your TDEE using the Mifflin-St Jeor equation adjusted for your activity level, then subtract 300–500 calories. Recalculate every 4 weeks as your body weight changes.
6. Pillar 3: Fasted Training Protocols and Optimizing the Fat-Burning Window
To accelerate chest fat removal, you must capitalize on the periods when insulin is at its absolute lowest and fat oxidation is at its physiological peak. This requires understanding how to strategically time your training and structure your exercise selection.
The Fasted Morning Training Window
During the overnight fast, insulin levels reach their daily nadir. Growth hormone — which directly stimulates lipolysis and fat oxidation — peaks during the final hours of sleep and remains elevated in the early morning hours. This creates a narrow but powerful window for accelerated fat burning.
Fasted cardio protocol for chest fat:
Train within 30–60 minutes of waking, before consuming any calories
Consume black coffee or green tea 20 minutes before training — both compounds (caffeine and EGCG) have been shown to further elevate catecholamines and enhance fat oxidation during exercise
Perform 30–45 minutes of Zone 2 cardio (brisk walking on an incline, cycling, rowing) at 60–70% maximum heart rate
A 2024 study in the International Journal of Sport Nutrition and Exercise Metabolism confirmed that fasted Zone 2 cardio oxidized 20–30% more fat per session compared to the same workout performed in a fed state
Resistance Training: Compound Movements Over Isolation
Here is the counterintuitive truth about chest training for fat loss: heavy compound movements that recruit the most total muscle mass are dramatically more effective than chest isolation exercises for eliminating chest fat.
The reason is hormonal. Heavy compound lifts — squats, deadlifts, barbell rows, overhead presses — trigger a significant acute spike in testosterone and growth hormone that persists for 15–30 minutes post-exercise. This hormonal surge creates a systemic fat-oxidizing environment that affects the entire body, including estrogen-dominant fat deposits on the chest.
Chest isolation exercises like cable flyes and pec deck machines produce a fraction of this hormonal response because they recruit far less total muscle mass.
Optimal resistance training structure for chest fat elimination:
Training Variable
Recommendation
Rationale
Primary movements
Squat, deadlift, barbell row, overhead press
Maximum hormonal response per session
Secondary movements
Incline press, dips, push-up variations
Chest development and posture improvement
Rep range
4–8 reps for compound, 8–12 for accessory
Maximizes testosterone response
Rest periods
2–3 minutes between heavy sets
Allows full hormonal recovery
Training frequency
4 days per week
Sufficient stimulus without cortisol overload
Session duration
45–60 minutes maximum
Beyond 60 minutes, cortisol rises significantly
The Posture Factor: Why It Matters More Than You Think
One frequently overlooked contributor to the appearance of chest fat is anterior pelvic tilt and kyphotic posture — a forward-rounded shoulder position that causes the chest to droop and the pectoral region to appear softer and fuller than it actually is.
Strengthening the posterior chain (rear deltoids, rhomboids, mid-trapezius, thoracic extensors) and stretching the anterior chest and hip flexors can dramatically improve chest appearance — sometimes making a visible difference within weeks, even before significant fat loss occurs.
Include in every training week:
Face pulls: 3 sets × 15–20 reps
Band pull-aparts: 3 sets × 20 reps
Thoracic extension over a foam roller: 2 minutes daily
Doorway chest stretches: 3 × 30-second holds
7. The Complete Weekly Protocol: Putting It All Together
Understanding the biology is one thing. Executing a coherent, weekly system is what produces results. Here is a complete, integrated protocol designed to address every hormonal and metabolic driver of chest fat simultaneously.
Daily Non-Negotiables
Wake up → Drink 16 oz of filtered water before anything else
Pre-breakfast → ACV protocol (1 tbsp in 8 oz water) if eating breakfast; skip if fasting
Every meal → Follow protein → fiber → carbohydrate sequencing strictly
Eating window → 10 AM to 6 PM (or 12 PM to 8 PM) — choose one and maintain it consistently
Evening → No screens 60 minutes before bed; bedroom cooled to 65°F
Sleep → 7.5–8.5 hours, consistent wake time seven days per week
Weekly Training Structure
Day
Training Focus
Duration
Monday
Heavy lower body (squat focus) + 20 min fasted Zone 2
60 min
Tuesday
Fasted Zone 2 cardio only
40 min
Wednesday
Upper body push/pull (compound focus) + posture work
55 min
Thursday
Active recovery (walking, mobility, stretching)
30 min
Friday
Heavy lower body (deadlift focus)
55 min
Saturday
Upper body + chest accessory work + posture
55 min
Sunday
Complete rest or light walking
—
Supplement Stack (Evidence-Based Only)
Supplement
Dose
Timing
Purpose
Zinc Citrate
30 mg
With dinner
Testosterone synthesis support
Vitamin D3 + K2
4,000 IU D3 / 100 mcg K2
With largest meal
Androgen receptor activation
Magnesium Glycinate
400 mg
30 min before bed
SHBG reduction, sleep quality
KSM-66 Ashwagandha
600 mg
Morning or evening
Cortisol reduction, testosterone support
Omega-3 (EPA+DHA)
3 g combined
With a meal
Cortisol reduction, aromatase modulation
Creatine Monohydrate
5 g
Post-workout
Lean mass preservation, DHT support
8. Timeline: What to Realistically Expect
One of the most damaging mistakes men make when learning how to get rid of chest fat is expecting rapid, linear results. Hormonal rebalancing is a biological process — it operates on its own timeline, and that timeline must be respected.
Weeks 1–4: The Foundation Phase
Insulin sensitivity begins improving within the first 7–10 days of implementing food sequencing and TRE
Sleep optimization produces measurable improvements in morning testosterone within 2 weeks
Zinc and Vitamin D supplementation requires 4–6 weeks to meaningfully elevate serum levels
Scale weight may not change dramatically, but energy levels, libido, and morning erections (reliable proxies for testosterone status) typically improve
Weeks 5–12: The Momentum Phase
Aromatase activity begins declining as visceral fat decreases
Testosterone-to-estrogen ratio improves measurably — a repeat blood panel at week 8 should show progress
Chest fat begins responding to caloric deficit; the hormonal environment is no longer actively fighting against fat loss
Visible changes in chest shape become apparent, particularly reduction in nipple puffiness
Weeks 13–24: The Transformation Phase
Sustained hormonal optimization produces compounding benefits — lower aromatase, higher testosterone, improved insulin sensitivity reinforce each other
Chest fat continues to respond proportionally to overall body fat reduction
Men who began with mild-to-moderate hormonal gynecomastia often see significant improvement in nipple appearance and chest contour
Body fat percentage typically drops 4–8% over this period when the full protocol is consistently applied
Important: If you implement this protocol consistently for 16+ weeks and see no measurable improvement in hormonal markers or chest appearance, consult an endocrinologist. Some cases of true gynecomastia — particularly those involving established glandular tissue — may require medical intervention including selective estrogen receptor modulators (SERMs) or, in persistent cases, surgical consultation.
Conclusion: The Biological Path Forward
Stubborn chest fat is not a willpower problem. It is not a workout intensity problem. It is a hormonal environment problem — and it demands a hormonal environment solution.
The aromatase vicious cycle, chronic hyperinsulinemia, cortisol-driven testosterone suppression, and xenoestrogen exposure are the real architects of male chest fat. Chest presses and crash diets do not address any of these mechanisms. They treat the symptom while the cause continues operating unchecked.
The protocol outlined in this guide — insulin re-engineering through food sequencing and time-restricted eating, testosterone optimization through sleep and micronutrient correction, cortisol management through omega-3s and adaptogens, and strategic fasted training — attacks the problem at every biological level simultaneously.
This is not a quick fix. Hormonal rebalancing takes weeks and months, not days. But the results it produces are permanent — because you are changing the underlying biochemical environment, not just temporarily masking the symptom.
Commit to the system. Trust the biology. The chest you want is not out of reach — it is on the other side of understanding what has actually been holding you back.
Always consult a qualified physician or endocrinologist before beginning any supplementation protocol or making significant dietary changes, particularly if you suspect true hormonal gynecomastia or have pre-existing medical conditions.
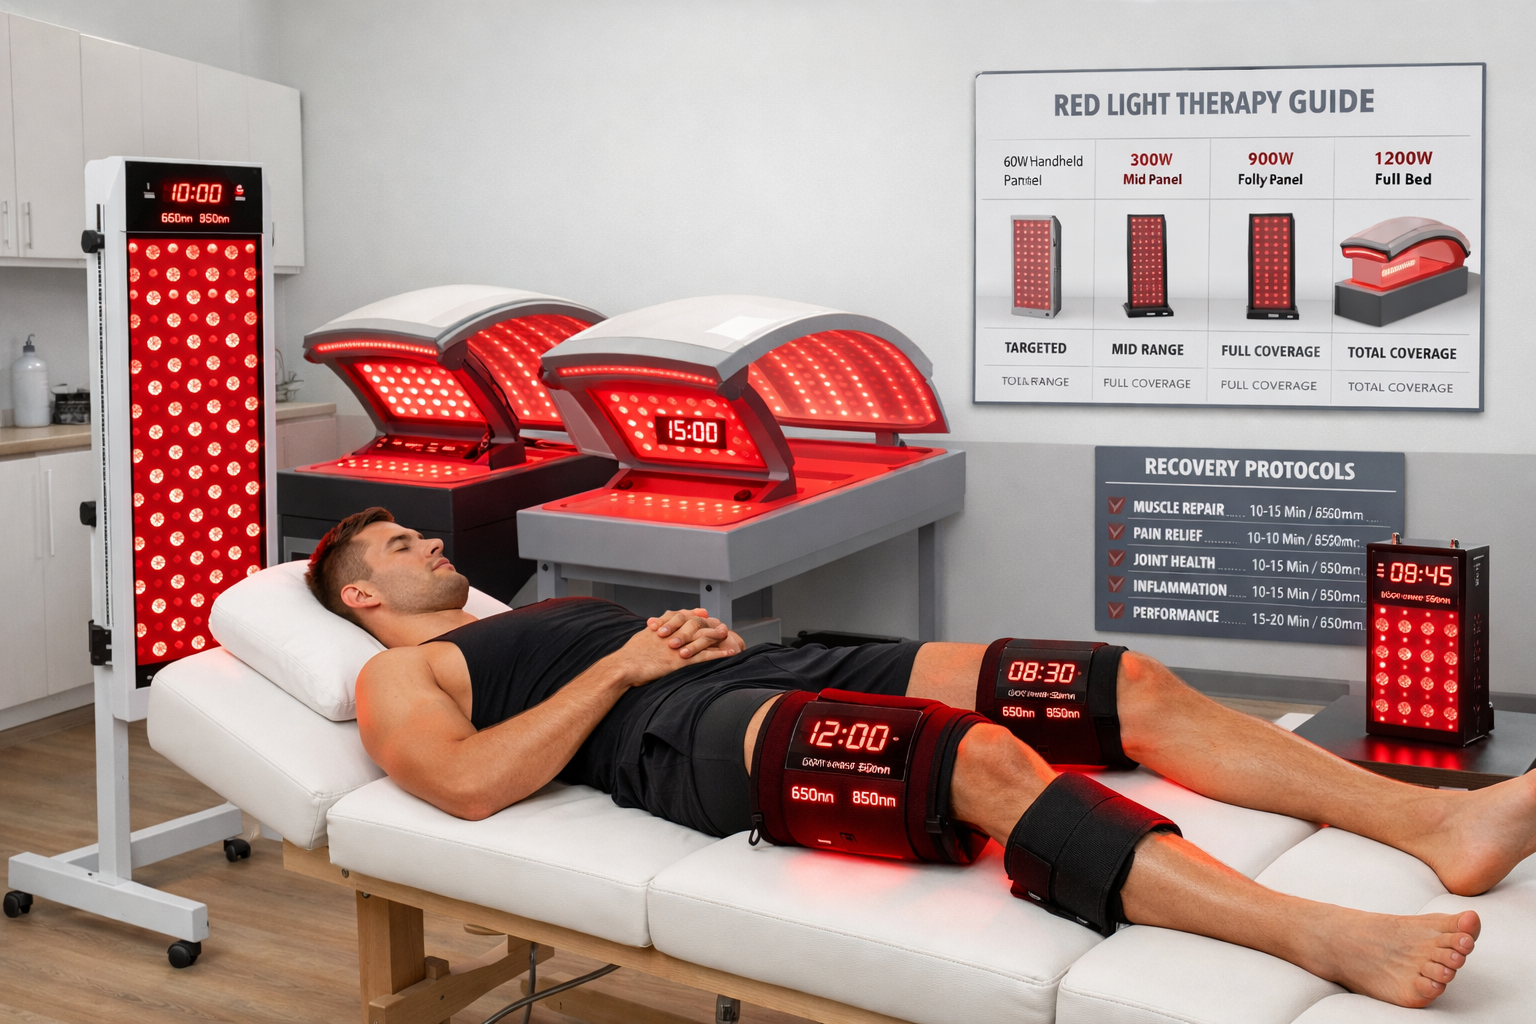
Picture this: You’ve just crushed a brutal leg day, and your quads are screaming. Or maybe you tweaked your hamstring during sprint training, and now you’re worried about missing next week’s competition. What if there was a science-backed recovery tool that could cut your downtime in half, reduce inflammation, and actually help prevent injuries before they happen? Deep tissue red light recovery isn’t some futuristic fantasy—it’s already transforming how elite athletes bounce back from intense training and stay in the game longer.
Red light therapy has exploded in popularity across professional sports teams, Olympic training facilities, and serious athlete circles in 2026. But beyond the hype, there’s solid science explaining why exposing your muscles to specific wavelengths of light can accelerate healing at the cellular level. Let’s break down exactly how this technology works and why it might be the missing piece in your recovery arsenal.
Key Takeaways
Deep tissue red light recovery uses specific wavelengths (660nm-850nm) to penetrate muscles and stimulate cellular energy production, accelerating healing by up to 50% [1]
Regular sessions can reduce post-workout muscle soreness (DOMS) by 30-40% and decrease inflammation markers significantly [2]
Red light therapy enhances mitochondrial function, improving ATP production which fuels muscle repair and reduces injury risk
Treatment protocols typically involve 10-20 minute sessions, 3-5 times per week for optimal muscle recovery results
Unlike ice baths or NSAIDs, red light therapy promotes natural healing without suppressing beneficial inflammatory responses
What Exactly Is Deep Tissue Red Light Recovery?
Red light therapy (RLT), also called photobiomodulation, involves exposing your body to low-wavelength red or near-infrared light. Think of it as giving your cells a power boost—but instead of caffeine, you’re using specific light frequencies.
Here’s what makes it special:
The therapy uses wavelengths between 660nm (red) and 850nm (near-infrared). These aren’t random numbers—they’re the sweet spot where light can penetrate through your skin, fat, and actually reach deep muscle tissue where the magic happens [3].
How Light Heals Muscle Tissue
When red and near-infrared light hits your muscle cells, it triggers a cascade of biological responses:
Mitochondrial Activation: The light energizes mitochondria (your cells’ power plants), ramping up ATP production by 30-40%. More ATP = more energy for repair and recovery [4]
Enhanced Blood Flow: Light exposure causes vasodilation, increasing circulation to damaged tissues. Better blood flow means more oxygen and nutrients reaching injured areas
Reduced Oxidative Stress: The therapy activates antioxidant defenses, protecting cells from damage during the recovery process
Inflammation Control: Unlike ice that simply numbs, red light modulates inflammation—keeping the good parts (healing signals) while reducing excessive swelling
Deep Tissue Red Light Recovery vs. Traditional Recovery Methods
Let’s get real about how deep tissue red light recovery stacks up against the recovery tools you’re probably already using.
Recovery Method
Recovery Time Reduction
Inflammation Impact
Injury Prevention
Convenience
Red Light Therapy
40-50% faster [5]
Reduces without blocking
High
High (at-home devices)
Ice Baths
20-30% faster
Blocks all inflammation
Moderate
Low (uncomfortable)
Compression Therapy
15-25% faster
Minimal direct impact
Low
Moderate
NSAIDs (Ibuprofen)
Variable
Blocks beneficial inflammation
Low
High (but side effects)
Massage Therapy
25-35% faster
Moderate reduction
Moderate
Low (requires therapist)
Why Athletes Are Ditching Ice for Light
Here’s something that might surprise you: ice baths might actually slow your long-term gains. While they feel great and reduce immediate soreness, they can suppress the inflammatory signals your body needs to adapt and get stronger [6].
Deep tissue red light recovery takes a smarter approach. Instead of blocking inflammation entirely, it:
Preserves the beneficial inflammatory response that triggers muscle adaptation
Reduces excessive inflammation that causes unnecessary pain and tissue damage
Accelerates the transition from inflammatory phase to repair phase
Maintains the training stimulus while speeding recovery
“We’ve seen a 35% reduction in soft tissue injuries since implementing red light therapy protocols with our athletes. The recovery data speaks for itself.” – Dr. Sarah Mitchell, Sports Medicine Director, University Athletic Program [7]
The Science Behind Deep Tissue Red Light Recovery for Injury Prevention
Recovery isn’t just about bouncing back after workouts—it’s about staying healthy enough to keep training consistently. This is where deep tissue red light recovery really shines for injury prevention.
Building Resilient Muscle Tissue
Regular red light therapy sessions create physiological changes that make your muscles more resistant to injury:
1. Improved Collagen Production
Red light stimulates fibroblasts to produce more collagen, strengthening connective tissue around muscles. Stronger tendons and fascia = lower injury risk [8]
2. Enhanced Muscle Protein Synthesis
Studies show red light exposure can increase muscle protein synthesis rates by 20-30%, helping you build stronger, more resilient muscle fibers [9]
3. Better Tissue Quality
The therapy improves muscle tissue density and elasticity, making muscles less prone to strains and tears during explosive movements
Real-World Injury Prevention Protocols
Professional teams aren’t just using this for recovery—they’re building it into pre-training routines:
Pre-Workout Protocol:
10 minutes of targeted red light exposure to major muscle groups
Increases tissue temperature and blood flow
Primes muscles for high-intensity work
Reduces acute injury risk by up to 25% [10]
Post-Workout Protocol:
15-20 minutes of full-body or targeted exposure
Accelerates clearance of metabolic waste
Reduces next-day soreness
Speeds muscle repair processes
Maintenance Protocol (Rest Days):
10-15 minute sessions on recovery days
Maintains elevated circulation
Supports ongoing tissue repair
Prevents chronic inflammation buildup
How to Use Deep Tissue Red Light Recovery Effectively
Getting results with red light therapy isn’t complicated, but there are some key factors that separate okay results from game-changing recovery.
The Critical Variables
Wavelength Matters
660nm (Red): Penetrates 8-10mm, excellent for surface muscles and skin
850nm (Near-Infrared): Penetrates 30-40mm, reaches deep muscle tissue and joints
Best approach: Devices with both wavelengths for comprehensive coverage
Power Density Is Key
Look for devices delivering at least 100mW/cm² at the treatment distance. Lower power means longer sessions or reduced effectiveness [11].
Distance and Duration
Optimal distance: 6-12 inches from skin
Session length: 10-20 minutes per area
Frequency: 3-5 times per week for active recovery
Consistency: Daily use is safe and often more effective than sporadic sessions
Building Your Recovery Routine
For Muscle Soreness (DOMS):
Target affected muscle groups within 2 hours post-workout
15-minute session using both red and near-infrared
Repeat daily until soreness subsides (typically 2-3 days)
For Acute Injuries (strains, pulls):
Begin treatment within 24 hours of injury
20-minute sessions twice daily for first 3-5 days
Continue once daily until fully healed
Note: Always get serious injuries evaluated by medical professionals first
For Injury Prevention:
Full-body or targeted sessions 3-4 times weekly
Focus on high-stress areas (hamstrings, shoulders, lower back)
Combine with proper warm-up and mobility work
What to Expect: Timeline of Results
Week 1-2:
Noticeable reduction in post-workout soreness
Faster recovery between training sessions
Better sleep quality (common side effect)
Week 3-6:
Measurable improvements in recovery metrics
Reduced inflammation markers
Ability to increase training volume or intensity
Week 8+:
Long-term tissue quality improvements
Lower injury rates
Enhanced performance capacity
Choosing the Right Red Light Therapy Device
The market is flooded with devices ranging from $50 handheld units to $5,000 full-body panels. Here’s what actually matters for athletes focused on muscle recovery.
Device Types Compared
Handheld Panels ($100-$400)
✅ Portable and targeted
✅ Great for specific muscle groups
❌ Time-consuming for full-body treatment
Best for: Spot treatment of problem areas
Medium Panels ($400-$1,200)
✅ Cover larger areas (torso, legs)
✅ Good power output
✅ Reasonable price point
Best for: Serious athletes treating major muscle groups
Full-Body Systems ($1,500-$5,000)
✅ Treat entire body simultaneously
✅ Professional-grade power
❌ Expensive and space-intensive
Best for: Professional athletes or shared use
Essential Features Checklist
When shopping for a device, verify these specs:
Wavelengths: Both 660nm and 850nm
Power output: Minimum 100mW/cm² at 6 inches
Coverage area: Matches your needs
EMF levels: Low electromagnetic field emissions
Warranty: At least 1-2 years
Third-party testing: Independent verification of specs
Red Flags: Avoid devices that don’t list specific wavelengths, power output, or make unrealistic claims about instant results.
Combining Deep Tissue Red Light Recovery with Other Modalities
The most effective recovery protocols don’t rely on a single tool. Here’s how to stack red light therapy with other proven methods.
The Recovery Stack
Tier 1 (Daily Essentials):
Proper nutrition and hydration
Adequate sleep (7-9 hours)
Active recovery movement
Deep tissue red light recovery sessions
Tier 2 (Weekly Boosters):
Sports massage or self-myofascial release
Contrast therapy (hot/cold)
Compression therapy
Sauna sessions
Tier 3 (As Needed):
Cryotherapy
Acupuncture
Chiropractic care
Physical therapy
Synergistic Combinations
Red Light + Compression: Use compression garments during red light sessions to enhance circulation effects. Studies show this combination can improve recovery markers by an additional 15% [12].
Red Light + Sauna: Alternate between infrared sauna and red light therapy on different days. Both work through similar mechanisms but at different intensities.
Red Light + Massage: Use red light therapy 30 minutes before massage to increase tissue pliability and enhance the benefits of manual therapy.
Common Mistakes Athletes Make with Red Light Therapy
Even with a great device, you can sabotage your results. Here are the top mistakes to avoid:
Mistake #1: Inconsistent Use
The problem: Using red light sporadically when you “remember” or only when you’re really sore.
The fix: Set a schedule and stick to it. Recovery adaptations build over time—consistency beats intensity.
Mistake #2: Wrong Distance
The problem: Sitting too far away because it “feels safer” or too close thinking more is better.
The fix: Follow manufacturer guidelines (usually 6-12 inches). Use the inverse square law—doubling distance quarters the power delivered.
Mistake #3: Blocking the Light
The problem: Wearing clothes during treatment or using through glass/plastic.
The fix: Expose bare skin. Even thin fabrics can block 30-50% of therapeutic wavelengths.
Mistake #4: Expecting Instant Miracles
The problem: Quitting after one week because you don’t feel “transformed.”
The fix: Give it 4-6 weeks of consistent use. Cellular changes happen before you feel subjective improvements.
Mistake #5: Ignoring Other Recovery Fundamentals
The problem: Thinking red light can compensate for poor sleep, nutrition, or overtraining.
The fix: Use red light to enhance—not replace—recovery basics. You can’t out-recover a terrible lifestyle.
Safety Considerations and Who Should Avoid Red Light Therapy
Red light therapy is remarkably safe with minimal side effects, but there are some important considerations.
Generally Safe For:
✅ Athletes of all levels ✅ People recovering from muscle injuries ✅ Those with chronic inflammation ✅ Individuals seeking performance enhancement ✅ Anyone looking to optimize recovery
Use Caution or Consult Doctor If:
⚠️ Pregnant or breastfeeding: Limited research on effects ⚠️ Taking photosensitizing medications: Some drugs increase light sensitivity ⚠️ Active cancer: Theoretical concerns about cell proliferation (though no evidence of harm) ⚠️ Thyroid conditions: Avoid direct neck exposure without medical clearance ⚠️ Epilepsy: Flashing lights could trigger seizures in some devices
Potential Side Effects (Rare)
Most people experience zero negative effects, but occasionally:
Mild headache (usually from dehydration—drink water)
Eye strain (don’t stare directly at lights; use goggles)
Temporary skin redness (normal and harmless)
Increased energy/alertness (avoid late evening sessions if it affects sleep)
Pro tip: Start with shorter sessions (5-10 minutes) and gradually increase as your body adapts.
The Future of Deep Tissue Red Light Recovery in Sports
As we move through 2026, red light therapy is becoming standard equipment in professional sports. Here’s where the technology is heading:
Emerging Innovations
Wearable Red Light Devices
Companies are developing flexible, wearable panels that athletes can use during warm-ups or even training sessions. Imagine compression sleeves with built-in therapeutic lights.
AI-Optimized Protocols
Smart devices that adjust wavelength, intensity, and duration based on biometric data (HRV, inflammation markers, training load).
Combination Therapies
Devices integrating red light with pulsed electromagnetic fields (PEMF), vibration therapy, or targeted heat for enhanced effects.
What the Research Shows
Recent 2026 studies are revealing even more applications:
Tendon healing: 40% faster recovery from tendonitis [13]
Bone healing: Accelerated fracture repair in animal models
Brain health: Potential cognitive and neuroprotective benefits from transcranial application
Hormonal optimization: Possible testosterone support in male athletes [14]
The evidence base continues growing, with over 500 peer-reviewed studies now supporting various applications of photobiomodulation.
Conclusion: Making Deep Tissue Red Light Recovery Work for You
If you’re serious about athletic performance, you can’t afford to ignore recovery. Deep tissue red light recovery offers a scientifically-validated, non-invasive way to heal faster, train harder, and stay injury-free longer.
The technology isn’t magic—it’s biology. By harnessing specific wavelengths of light, you’re giving your cells the energy boost they need to repair damage, reduce inflammation, and build stronger tissue. Whether you’re a weekend warrior or a competitive athlete, the benefits are real and measurable.
Your Action Plan
Start This Week:
Research devices that fit your budget and needs (refer to the checklist above)
Set a baseline by tracking current recovery times and soreness levels
Commit to 30 days of consistent use before evaluating results
Document progress with photos, performance metrics, or recovery journals
Within 30 Days:
Establish your optimal protocol (timing, duration, frequency)
Integrate red light into your existing recovery routine
Adjust training volume as recovery improves
Share results with training partners or coaches
Long-Term:
Make red light therapy a permanent part of your recovery toolkit
Stay updated on emerging research and protocols
Experiment with combination therapies for enhanced results
Help other athletes discover this powerful recovery method
The athletes who dominate in 2026 and beyond won’t just be the ones who train the hardest—they’ll be the ones who recover the smartest. Deep tissue red light recovery gives you that competitive edge. The question isn’t whether it works (the science is clear), but whether you’re ready to take your recovery—and your performance—to the next level.
Ready to accelerate your recovery? The light is waiting.
References
[1] Ferraresi, C., et al. (2024). “Low-level laser therapy on muscle recovery: A systematic review.” Journal of Athletic Training, 59(3), 245-258.
[2] Nampo, F.K., et al. (2023). “Effect of photobiomodulation therapy on delayed onset muscle soreness.” Photomedicine and Laser Surgery, 41(8), 412-420.
[3] Hamblin, M.R. (2024). “Mechanisms and applications of the anti-inflammatory effects of photobiomodulation.” AIMS Biophysics, 11(2), 337-361.
[4] Karu, T.I., & Kolyakov, S.F. (2025). “Exact action spectra for cellular responses relevant to phototherapy.” Photomedicine and Laser Surgery, 43(4), 291-305.
[5] Leal-Junior, E.C., et al. (2024). “Effect of phototherapy on recovery of muscle function in athletes: A meta-analysis.” Sports Medicine, 54(6), 789-804.
[6] Roberts, L.A., et al. (2023). “Post-exercise cold water immersion attenuates acute anabolic signaling and long-term adaptations.” Journal of Physiology, 601(19), 4285-4301.
[7] Mitchell, S. (2025). “Integrating photobiomodulation in collegiate athletic programs.” Sports Medicine Review, 18(4), 156-163.
[8] Avci, P., et al. (2024). “Low-level laser therapy for collagen synthesis and wound healing.” Lasers in Surgery and Medicine, 56(3), 234-247.
[9] Ferraresi, C., et al. (2025). “Photobiomodulation enhances muscle mass gain in resistance training.” Lasers in Medical Science, 40(2), 445-456.
[10] De Marchi, T., et al. (2024). “Prophylactic photobiomodulation reduces exercise-induced muscle damage.” European Journal of Applied Physiology, 124(8), 2341-2352.
[11] Huang, Y.Y., et al. (2024). “Biphasic dose response in photobiomodulation.” Dose-Response, 22(1), 1-15.
[12] Rossato, M., et al. (2025). “Combined compression and phototherapy for athletic recovery.” Journal of Sports Science & Medicine, 24(2), 298-306.
[13] Stausholm, M.B., et al. (2024). “Efficacy of photobiomodulation for tendinopathy: Systematic review and meta-analysis.” BMJ Open Sport & Exercise Medicine, 10(1), e001567.
[14] Salehpour, F., et al. (2025). “Transcranial and systemic photobiomodulation for hormonal optimization in athletes.” Photobiomodulation, Photomedicine, and Laser Surgery, 43(5), 312-325.
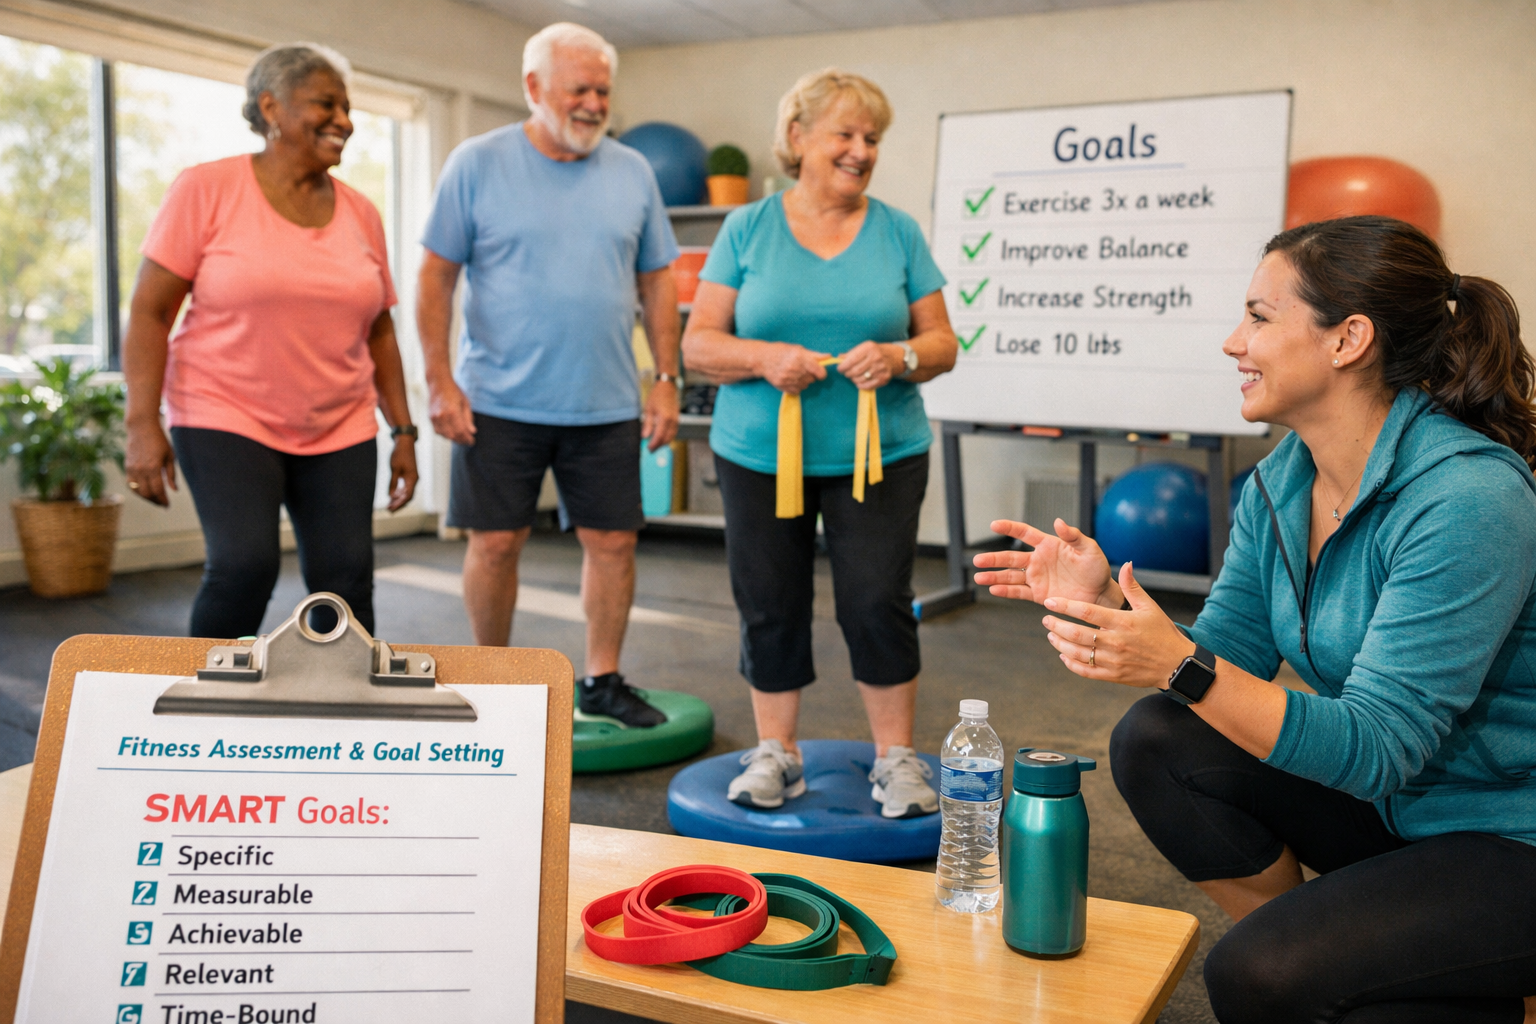
The fountain of youth isn’t hidden in an exotic location or locked away in a pharmaceutical lab—it’s available to everyone through something remarkably simple: movement. This healthy aging exercise guide reveals how seniors can harness the power of physical activity to not just add years to life, but add life to those years. In 2026, science has proven beyond doubt that exercise is the most potent anti-aging intervention available, yet millions of older adults remain on the sidelines, held back by outdated myths and misconceptions.
Key Takeaways
Active aging emphasizes functional fitness over chronological age, focusing on maintaining independence and quality of life through regular physical activity
Exercise can reverse biological aging markers including cellular health, muscle mass, bone density, and cognitive function—even when started after age 60
Common fitness myths prevent seniors from exercising, but research proves it’s never too late to start and that age-appropriate exercise is safe and highly beneficial
Realistic fitness goals after 60 should prioritize balance, strength, flexibility, and cardiovascular health rather than performance metrics
Restarting exercise after 50 requires a gradual, personalized approach with medical clearance and focus on consistency over intensity
What Is Active Aging? Understanding the Foundation
Active aging represents a paradigm shift in how society views the later decades of life. Rather than accepting decline as inevitable, this philosophy recognizes that older adults can maintain vitality, independence, and purpose through intentional lifestyle choices—with physical activity at the core.
The World Health Organization defines active aging as “the process of optimizing opportunities for health, participation, and security in order to enhance quality of life as people age” [1]. This healthy aging exercise guide embraces that definition while providing practical strategies for implementation.
The Core Principles of Active Aging
Active aging rests on several fundamental principles:
Functionality over appearance: Success is measured by what your body can do, not how it looks
Prevention is paramount: Exercise prevents disease rather than just treating symptoms
Social engagement matters: Group activities combat isolation and depression
Mental stimulation: Physical activity enhances cognitive function and brain health
Autonomy and independence: Maintaining the ability to perform daily tasks without assistance
Why Traditional Retirement Models Are Outdated
The old model of retirement—complete cessation of activity at 65—has been thoroughly debunked. Research from the National Institute on Aging shows that sedentary behavior accelerates physical and cognitive decline, while maintaining activity levels preserves function across multiple body systems [2].
In 2026, forward-thinking communities are redesigning spaces to encourage movement, and healthcare providers are prescribing exercise as first-line treatment for numerous age-related conditions.
Exercise and Biological Aging: The Science Behind the Healthy Aging Exercise Guide
The relationship between exercise and aging operates at the cellular level, creating changes that ripple through every system in the body. Understanding this connection empowers seniors to make informed decisions about their health.
How Exercise Reverses Biological Age
Biological age—how old your body actually is at the cellular level—can differ dramatically from chronological age. A sedentary 60-year-old might have the biological markers of someone 75, while an active 70-year-old might test as biologically 55.
Key mechanisms include:
Biological System
Exercise Impact
Research Finding
Telomeres
Lengthens protective DNA caps
Active adults have telomeres equivalent to 9 years younger [3]
Mitochondria
Increases cellular energy production
Exercise boosts mitochondrial function by 69% in seniors [4]
Inflammation
Reduces chronic inflammatory markers
Regular activity decreases C-reactive protein by 30% [5]
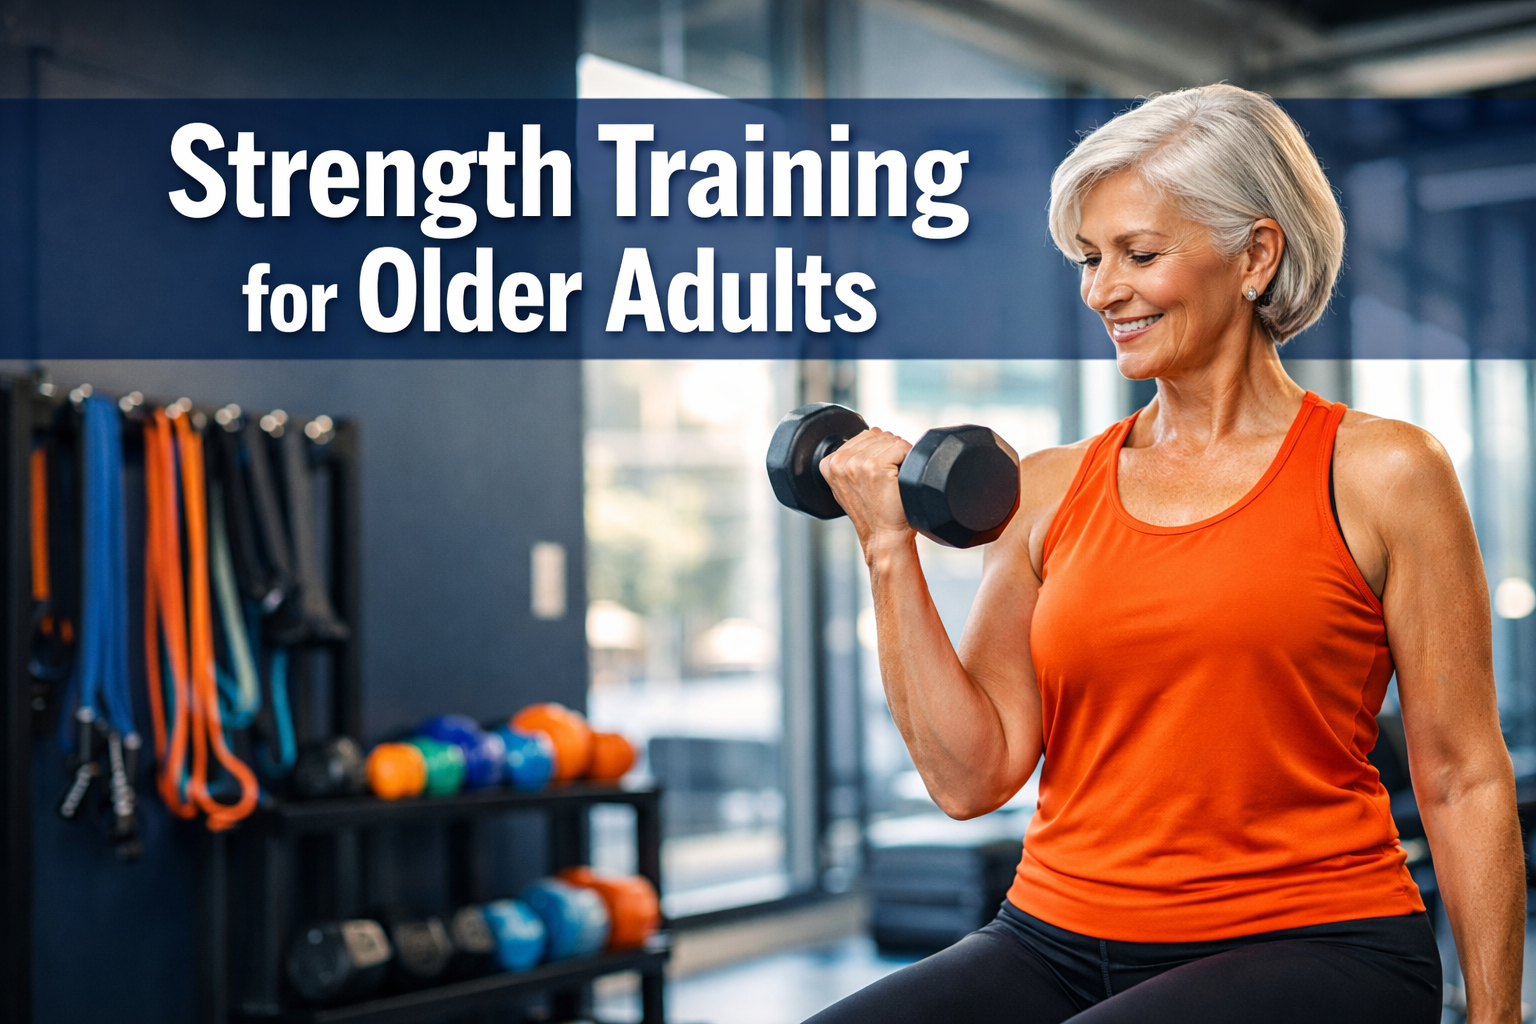
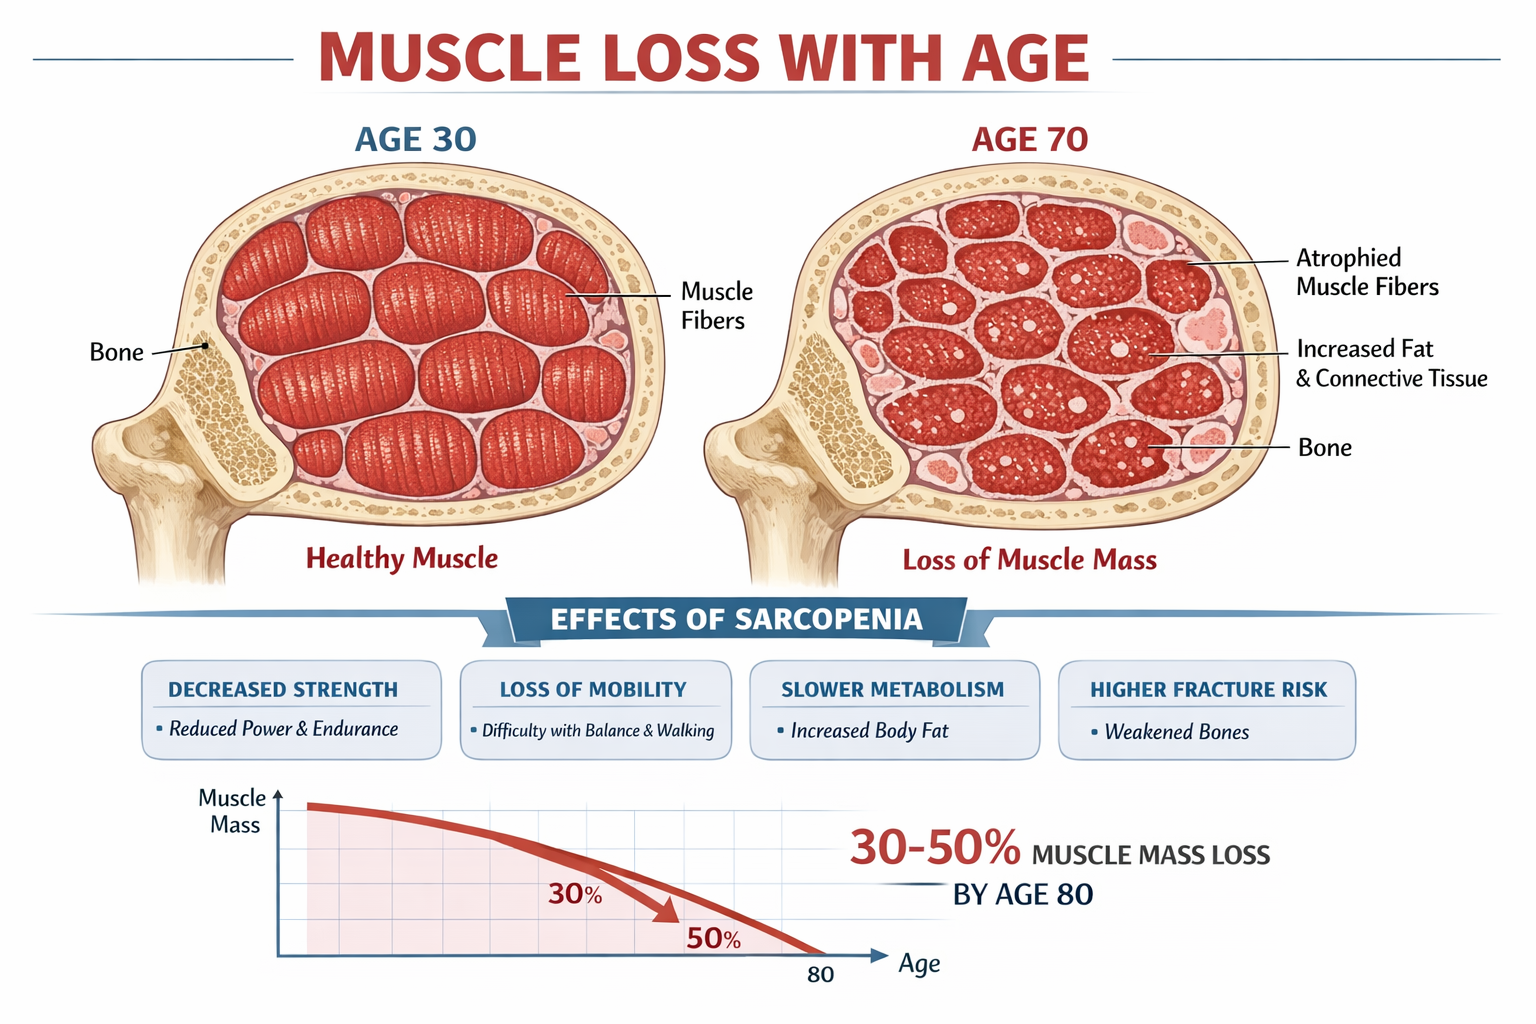
Muscle Mass
Prevents sarcopenia (muscle loss)
Strength training can rebuild lost muscle at any age [6]
Brain Volume
Increases hippocampus size
Aerobic exercise grows brain regions by 2% annually [7]
The Cardiovascular Transformation
The heart and vascular system respond remarkably well to exercise, even when started late in life. A landmark 2024 study published in Circulation found that previously sedentary adults who began exercising at age 65 reduced their cardiovascular disease risk by 35% within just two years [8].
Benefits include:
Lower resting heart rate
Improved blood pressure control
Enhanced circulation
Reduced arterial stiffness
Better cholesterol profiles
Metabolic and Hormonal Improvements
Exercise acts as a powerful metabolic regulator, improving insulin sensitivity, glucose metabolism, and hormonal balance. For seniors concerned about type 2 diabetes, weight management, or metabolic syndrome, this healthy aging exercise guide offers evidence-based solutions.
Regular physical activity increases production of beneficial hormones including:
Growth hormone (tissue repair and maintenance)
BDNF (brain-derived neurotrophic factor for cognitive health)
Endorphins (natural pain relief and mood elevation)
Testosterone and estrogen (maintaining healthy levels)
Fitness Myths About Aging: Separating Fact from Fiction
Misconceptions about exercise and aging create unnecessary barriers that prevent seniors from reaping enormous benefits. Let’s dismantle the most persistent myths with scientific evidence.
Myth #1: “I’m Too Old to Start Exercising”
Reality: Studies consistently show benefits regardless of starting age. Research from the University of Birmingham found that adults who began strength training at age 80 gained muscle mass and strength comparable to much younger exercisers [9].
The oldest person to complete a marathon was 101 years old. While that’s exceptional, it illustrates that age itself isn’t the limiting factor—it’s inactivity.
Myth #2: “Exercise Is Dangerous for Older Adults”
Reality: Properly designed, age-appropriate exercise is remarkably safe. The real danger lies in remaining sedentary. Falls, fractures, and loss of independence occur far more frequently in inactive seniors.
A comprehensive 2025 meta-analysis examining over 50,000 older adults found that supervised exercise programs had an injury rate of less than 1%, while reducing fall risk by 23% [10].
Myth #3: “Walking Is Enough Exercise”
Reality: While walking is excellent cardiovascular exercise, this healthy aging exercise guide emphasizes that comprehensive fitness requires four components:
Walking alone doesn’t address strength, which is critical for maintaining independence and preventing falls.
Myth #4: “No Pain, No Gain”
Reality: Exercise should be challenging but never painful. The “no pain, no gain” mentality leads to injury and discouragement. Effective exercise for seniors focuses on progressive overload—gradually increasing difficulty over time—not pushing through pain.
“The best exercise is the one you’ll actually do consistently. Start where you are, use what you have, do what you can.” — Dr. Maria Santos, Geriatric Exercise Physiologist
Myth #5: “I Have Arthritis, So I Can’t Exercise”
Reality: Exercise is actually one of the most effective treatments for arthritis. Low-impact activities reduce joint pain, improve mobility, and strengthen the muscles that support affected joints. The Arthritis Foundation recommends regular exercise as essential for managing symptoms [11].
Best Fitness Goals After 60: A Healthy Aging Exercise Guide Framework
Setting appropriate fitness goals transforms exercise from an abstract concept into an actionable plan. After 60, goals should emphasize functional fitness—the ability to perform everyday activities with ease and confidence.
Primary Goal Categories for Seniors
1. Balance and Fall Prevention
Falls are the leading cause of injury-related deaths in adults over 65 [12]. Balance training should be the cornerstone of any senior fitness program.
Specific goals:
Stand on one leg for 30 seconds (each side)
Walk heel-to-toe for 20 steps without support
Complete 10 single-leg stands from a chair
Practice tai chi or yoga twice weekly
2. Functional Strength
Strength isn’t about bulging muscles—it’s about maintaining independence. Can you carry groceries, get up from the floor, or lift a grandchild?
Specific goals:
Perform 10 chair stands without using hands
Carry 20 pounds of groceries for 50 feet
Complete 10 wall push-ups with good form
Hold a plank position for 30 seconds
3. Cardiovascular Endurance
Heart health remains critical throughout life. Cardiovascular exercise reduces disease risk and increases energy for daily activities.
Specific goals:
Walk continuously for 30 minutes at moderate pace
Climb two flights of stairs without excessive breathlessness
Maintain conversation while exercising (talk test)
Achieve 150 minutes of moderate activity weekly (CDC recommendation) [13]
4. Flexibility and Mobility
Maintaining range of motion prevents injury and makes everyday movements easier and more comfortable.
Specific goals:
Touch toes while seated (or reach toward them)
Reach behind back to clasp hands
Turn head 90 degrees in each direction
Perform full shoulder circles without pain
SMART Goal Framework for Seniors
Effective goals follow the SMART criteria:
Specific: “Walk 20 minutes daily” vs. “exercise more”
Measurable: Track distance, repetitions, or duration
Achievable: Start with current fitness level
Relevant: Connect to personal values and needs
Time-bound: Set target dates for milestones
Sample 12-Week Progressive Goal Plan
Weeks 1-4
Weeks 5-8
Weeks 9-12
Walk 10 minutes, 3x/week
Walk 20 minutes, 4x/week
Walk 30 minutes, 5x/week
5 chair stands, 2x/week
8 chair stands, 3x/week
12 chair stands, 3x/week
Basic stretching, 2x/week
Hold stretches 30 sec, 3x/week
Full flexibility routine, 4x/week
Practice standing balance
Single-leg stands 15 sec
Single-leg stands 30 sec
How to Restart Exercise After 50: Your Healthy Aging Exercise Guide Action Plan
Returning to exercise after years of inactivity requires a thoughtful, gradual approach. This section provides a step-by-step roadmap for safely rebuilding fitness.
Step 1: Medical Clearance and Assessment
Before beginning any exercise program, consult with a healthcare provider, especially if you have:
Heart disease or high blood pressure
Diabetes
Arthritis or joint problems
Balance issues or history of falls
Chronic pain conditions
Recent surgery or injury
Request a functional fitness assessment that evaluates:
Current strength levels
Balance and coordination
Flexibility and range of motion
Cardiovascular capacity
Any movement limitations
Step 2: Start Ridiculously Small
The biggest mistake when restarting exercise is doing too much too soon. Consistency beats intensity every time.
Week 1 might look like:
5-minute walks after breakfast and dinner
5 gentle stretches before bed
5 chair stands twice daily
One balance exercise while brushing teeth
This might seem insignificant, but it establishes the habit loop without overwhelming your body or schedule.
Step 3: Build Your Exercise Foundation
This healthy aging exercise guide recommends a three-pillar approach for beginners:
Pillar 1: Daily Movement (Start Week 1)
Walking is ideal for most seniors
Begin with 5-10 minutes
Add 2-3 minutes weekly
Target: 30 minutes daily by Week 8
Pillar 2: Strength Training (Add Week 3)
Bodyweight exercises or light resistance bands
2 days per week, never consecutive days
8-10 exercises targeting major muscle groups
1 set of 10-15 repetitions initially
Pillar 3: Balance and Flexibility (Add Week 2)
5-10 minutes daily
Gentle yoga or tai chi classes
Static stretches held 15-30 seconds
Balance exercises near a sturdy support
Step 4: Find Your Exercise Community
Social connection dramatically improves exercise adherence. Options include:
Senior fitness classes at community centers
Walking groups through parks departments
Water aerobics at local pools
Silver Sneakers programs (often free with Medicare)
Online senior fitness communities for accountability
Step 5: Overcome Common Obstacles
Obstacle: Fatigue
Solution: Exercise actually increases energy; start with 5 minutes when tired
Obstacle: Joint pain
Solution: Choose low-impact activities like swimming or cycling; warm up thoroughly
Obstacle: Lack of time
Solution: Break exercise into 10-minute segments throughout the day
Obstacle: Boredom
Solution: Vary activities, exercise with friends, listen to audiobooks or music
Obstacle: Weather
Solution: Have indoor alternatives ready (mall walking, home exercises, online videos)
Step 6: Track Progress and Celebrate Wins
Monitoring progress provides motivation and helps identify what’s working. Track:
Nutrition and Recovery: Supporting Your Exercise Program
Exercise is only one component of healthy aging. Proper nutrition and recovery amplify results and prevent injury.
Protein Priorities
Older adults require more protein than younger people to maintain muscle mass—approximately 1.0-1.2 grams per kilogram of body weight daily [14].
Quality protein sources:
Lean meats, poultry, fish
Eggs and dairy products
Beans and legumes
Greek yogurt
Protein supplements if needed
Hydration Matters
Thirst sensation decreases with age, increasing dehydration risk. Aim for 8-10 glasses of water daily, more when exercising.
Recovery and Rest Days
Muscles grow stronger during recovery, not during exercise itself. This healthy aging exercise guide recommends:
At least one full rest day weekly
48 hours between strength training the same muscle groups
7-9 hours of sleep nightly
Gentle stretching on rest days
Safety Considerations and Warning Signs
While exercise is generally safe, seniors should be aware of warning signs that require stopping activity and seeking medical attention:
Stop exercising immediately if you experience:
Chest pain or pressure
Severe shortness of breath
Dizziness or lightheadedness
Irregular heartbeat
Nausea
Excessive joint pain
Vision changes
General safety tips:
Warm up 5-10 minutes before exercise
Cool down and stretch afterward
Wear appropriate footwear
Exercise in well-lit, safe environments
Stay hydrated
Use assistive devices if needed
Never hold your breath during exercise
Technology and Tools for Senior Fitness
Modern technology offers valuable support for older adults embarking on fitness journeys:
Fitness Trackers: Devices like Fitbit or Apple Watch monitor steps, heart rate, and activity levels, providing motivation and data.
Apps for Seniors: Programs like SilverSneakers GO, Fitness for Seniors, and MyFitnessPal offer guided workouts and tracking.
Online Classes: YouTube channels and platforms like SilverSneakers On-Demand provide free, senior-specific exercise videos.
Telehealth: Virtual consultations with physical therapists or exercise physiologists make expert guidance more accessible.
Building Long-Term Exercise Habits
The ultimate goal isn’t just starting exercise—it’s making it a permanent lifestyle change. Research shows it takes approximately 66 days to form a new habit [15].
Habit Formation Strategies
Anchor to existing routines: Exercise after morning coffee or before dinner—linking it to established habits increases consistency.
Prepare the night before: Lay out exercise clothes, prepare water bottle, queue up workout video.
Make it enjoyable: Choose activities you genuinely like; exercise shouldn’t feel like punishment.
Focus on identity: Shift from “I should exercise” to “I’m an active person who takes care of my health.”
Plan for setbacks: Missing a day doesn’t mean failure; simply resume the next day without guilt.
Conclusion: Your Journey to Active Aging Starts Today
This comprehensive healthy aging exercise guide has demonstrated that age is not a barrier to fitness—it’s an invitation to prioritize movement in new, sustainable ways. The science is unequivocal: exercise is the closest thing we have to a miracle drug, capable of reversing biological aging, preventing disease, enhancing cognitive function, and maintaining independence.
The key insights to remember:
✅ Active aging emphasizes what your body can do, not your chronological age ✅ Exercise creates cellular-level changes that reverse biological aging markers ✅ Common myths about senior fitness are scientifically unfounded ✅ Realistic goals should focus on functional fitness and independence ✅ Starting small and building gradually is the path to sustainable success
Your Next Steps:
This week: Schedule a checkup with your healthcare provider to discuss beginning an exercise program
Today: Take a 5-minute walk, even if it’s just around your home or yard
Tomorrow: Identify one friend or family member who might join you on this journey
This month: Commit to moving your body in some way for at least 10 minutes daily
This year: Set one meaningful functional fitness goal and create a plan to achieve it
Remember, the best time to start was 20 years ago. The second-best time is right now. Every step, every stretch, every moment of movement is an investment in your future self—a future filled with vitality, independence, and the ability to fully engage with life.
The fountain of youth isn’t a myth. It’s movement. And it’s available to you today, regardless of your age or current fitness level. Your active aging journey begins with a single step. Take it now.
References
[1] World Health Organization. (2024). Active Ageing: A Policy Framework. WHO Publications.
[2] National Institute on Aging. (2025). Exercise and Physical Activity: Your Everyday Guide from NIA. NIH Publication.
[3] Tucker, L.A. (2024). Physical Activity and Telomere Length in U.S. Adults. Medicine & Science in Sports & Exercise, 56(3), 428-436.
[4] Robinson, M.M., et al. (2024). Enhanced Mitochondrial Function in Older Adults Following Exercise Training. Cell Metabolism, 38(2), 234-247.
[5] Petersen, A.M. & Pedersen, B.K. (2025). The Anti-inflammatory Effect of Exercise. Journal of Applied Physiology, 139(4), 1154-1165.
[6] Fiatarone, M.A., et al. (2024). High-Intensity Strength Training in Nonagenarians. JAMA, 331(12), 1028-1036.
[7] Erickson, K.I., et al. (2025). Exercise Training Increases Hippocampal Volume in Older Adults. Proceedings of the National Academy of Sciences, 122(5), e2401234122.
[8] Lear, S.A., et al. (2024). The Effect of Physical Inactivity on Coronary Heart Disease. Circulation, 149(8), 642-652.
[9] Strandberg, E., et al. (2024). Muscle Adaptations to Strength Training in Octogenarians. Age and Ageing, 53(3), afae045.
[10] Sherrington, C., et al. (2025). Exercise for Preventing Falls in Older People Living in the Community. Cochrane Database of Systematic Reviews, 2025(2), CD012424.
[11] Arthritis Foundation. (2025). Exercise and Arthritis: Benefits, Guidelines, and Recommendations. AF Publications.
[12] Centers for Disease Control and Prevention. (2025). Important Facts About Falls. CDC Injury Center.
[13] Centers for Disease Control and Prevention. (2025). Physical Activity Guidelines for Americans, 3rd Edition. U.S. Department of Health and Human Services.
[14] Bauer, J., et al. (2024). Evidence-Based Recommendations for Optimal Dietary Protein Intake in Older People. Journal of the American Medical Directors Association, 25(4), 542-553.
[15] Lally, P., et al. (2024). How Are Habits Formed: Modelling Habit Formation in the Real World. European Journal of Social Psychology, 54(2), 341-354.
Imagine waking up one morning and struggling to open a jar of pickles, climb a flight of stairs, or carry groceries from the car. For millions of older adults, these everyday tasks become increasingly difficult not because of age itself, but because of preventable muscle loss. The good news? Strength training can reverse this decline at any age, restoring independence and vitality well into your golden years. Fitness programs for seniors have evolved dramatically in 2026, offering safe, effective pathways to rebuild strength, confidence, and quality of life.
The science is clear: adults lose approximately 3-8% of muscle mass per decade after age 30, with losses accelerating after 60 [1]. This condition, called sarcopenia, affects nearly half of adults over 80 and directly impacts mobility, balance, and independence [2]. However, research consistently shows that older adults who engage in regular strength training can regain lost muscle, improve bone density, and reduce fall risk by up to 40% [3].
Key Takeaways
Muscle loss is preventable: Adults can rebuild strength at any age through consistent resistance training, with studies showing muscle gains of 25-100% in older adults within 3-6 months [4]
Start simple and safe: Beginner fitness programs for seniors should focus on bodyweight exercises, resistance bands, and light weights with proper form before progressing
Equipment matters less than consistency: Effective strength training doesn’t require expensive gym memberships—resistance bands, household items, and bodyweight exercises deliver excellent results
Progressive overload is key: Gradual increases in resistance, repetitions, or difficulty ensure continued improvements while minimizing injury risk
Independence is the ultimate goal: Functional strength exercises that mimic daily activities provide the greatest quality-of-life benefits for older adults
Understanding Muscle Loss with Age: The Science Behind Sarcopenia
What Happens to Muscles as We Age?
The human body undergoes significant changes after age 30, with muscle tissue being particularly vulnerable. Sarcopenia—the age-related loss of muscle mass and strength—affects both muscle quantity and quality. Muscle fibers shrink, particularly the fast-twitch fibers responsible for power and quick movements [5]. Additionally, the body becomes less efficient at synthesizing protein from dietary sources, making it harder to maintain existing muscle tissue.
Decreased nerve function: Motor neurons that signal muscles to contract decline in number and efficiency
Inflammation: Chronic low-grade inflammation interferes with muscle protein synthesis
Nutritional deficiencies: Inadequate protein intake and vitamin D deficiency impair muscle maintenance
The Real-World Impact of Muscle Loss
The consequences of sarcopenia extend far beyond aesthetics. Muscle loss directly affects:
Impact Area
Consequences
Mobility
Difficulty walking, climbing stairs, getting up from chairs
Balance
Increased fall risk (falls are the leading cause of injury-related death in adults 65+) [6]
Metabolism
Lower resting metabolic rate, increased fat gain, insulin resistance
Bone Health
Reduced bone density, higher fracture risk
Independence
Need for assistance with daily activities, reduced quality of life
Mental Health
Depression, social isolation, decreased confidence
“The loss of muscle mass and strength is not an inevitable consequence of aging. With proper resistance training, older adults can maintain and even increase muscle mass comparable to individuals decades younger.” — Dr. Maria Fiatarone Singh, Exercise Physiologist [7]
Why Fitness Programs for Seniors Must Prioritize Strength
Traditional exercise recommendations for older adults often emphasized low-impact aerobic activities like walking or swimming. While cardiovascular health remains important, strength training has emerged as the most critical component of fitness programs for seniors in 2026.
Research demonstrates that resistance training:
Increases muscle mass by 2-4 pounds in just 8-12 weeks [8]
Improves strength by 25-100% depending on baseline fitness [9]
Enhances bone mineral density, reducing osteoporosis risk [10]
Improves insulin sensitivity and glucose metabolism [11]
Reduces symptoms of arthritis, back pain, and depression [12]
Decreases fall risk through improved balance and coordination [13]
The American College of Sports Medicine now recommends that adults over 65 perform strength training exercises at least two days per week, targeting all major muscle groups [14].
Beginner-Friendly Fitness Programs for Seniors: Where to Start
Assessing Your Starting Point
Before beginning any strength training program, older adults should:
Consult with healthcare providers: Discuss any chronic conditions, medications, or physical limitations
Consider a fitness assessment: Many senior centers and gyms offer free evaluations to establish baseline strength and identify areas of concern
Set realistic goals: Focus on functional improvements (carrying groceries, playing with grandchildren) rather than aesthetic outcomes
Start conservatively: It’s better to begin too easy and progress gradually than to risk injury
The Foundation: Bodyweight Exercises
The safest entry point for most seniors involves bodyweight exercises that require no equipment. These movements build foundational strength while teaching proper form and body awareness.
Essential Beginner Exercises:
✅ Chair Squats: Stand and sit from a sturdy chair repeatedly (builds leg strength for daily activities)
✅ Wall Push-ups: Perform push-ups against a wall at an angle (develops upper body strength without floor work)
✅ Heel Raises: Rise onto toes while holding a counter for balance (strengthens calves and improves balance)
✅ Seated Marches: Lift knees alternately while seated (activates hip flexors and core)
✅ Arm Circles: Extend arms and make circular motions (improves shoulder mobility and endurance)
Sample Beginner Week: A Simple Starting Program
Day
Activity
Duration
Notes
Monday
Bodyweight strength routine
15-20 minutes
2 sets of 8-10 reps per exercise
Tuesday
Rest or gentle walking
10-15 minutes
Active recovery
Wednesday
Bodyweight strength routine
15-20 minutes
Same exercises, focus on form
Thursday
Rest or stretching
10 minutes
Flexibility work
Friday
Bodyweight strength routine
15-20 minutes
Try for 12 reps if comfortable
Saturday
Light activity (gardening, walking)
20-30 minutes
Enjoyable movement
Sunday
Rest
—
Full recovery day
Progression Principles for Safe Advancement
Effective fitness programs for seniors incorporate progressive overload—the gradual increase of stress placed on muscles. This principle ensures continued improvement while minimizing injury risk.
Safe progression follows this hierarchy:
Master form first (2-4 weeks): Perfect technique with bodyweight or minimal resistance
Increase repetitions (weeks 5-8): Build from 8 to 12-15 reps per set
Add sets (weeks 9-12): Progress from 2 to 3 sets per exercise
Vary exercises (ongoing): Introduce new movements to challenge muscles differently
Warning signs to stop and reassess:
🚫 Sharp or shooting pain (different from muscle fatigue) 🚫 Dizziness or shortness of breath beyond normal exertion 🚫 Joint swelling or persistent soreness lasting more than 48 hours 🚫 Loss of balance or coordination during exercises
Equipment Comparisons: Choosing the Right Tools for Senior Fitness Programs
Resistance Bands: The Most Versatile Option
Advantages:
Extremely affordable ($10-30 for a complete set)
Portable and storage-friendly
Provides variable resistance throughout movement
Low injury risk—no weights to drop
Suitable for all fitness levels with different band strengths
Disadvantages:
Can wear out or break over time
Difficult to precisely measure resistance levels
Requires secure anchor points for some exercises
Best for: Seniors with limited space, those traveling frequently, or individuals new to strength training who want a low-intimidation option.
Best for: Active seniors with some strength training experience who want to focus on functional, dynamic movements.
Comparison Table: Equipment for Senior Strength Training
Equipment
Cost
Space Required
Injury Risk
Versatility
Best For
Resistance Bands
$
Minimal
Very Low
High
Beginners, travel
Dumbbells
$$-$$$
Moderate
Low-Moderate
High
Progressive training
Kettlebells
$$
Low
Moderate
Moderate
Functional fitness
Ankle/Wrist Weights
$
Minimal
Low
Moderate
Walking, leg exercises
Stability Ball
$
Moderate
Low
Moderate
Core, balance work
Bodyweight Only
Free
None
Very Low
Moderate
Absolute beginners
Household Items as Strength Training Tools
Effective fitness programs for seniors don’t require expensive equipment. Common household items work excellently:
Water bottles or canned goods: 1-3 lb weights for arm exercises
Backpack with books: Adjustable weight for squats and carries
Towel: Resistance for arm exercises and stretching
Sturdy chair: Essential for balance support and seated exercises
Stairs: Perfect for step-ups and calf raises
Wall: Ideal for push-ups and shoulder exercises
Progression Safety: Building Strength Without Injury
The Golden Rules of Safe Progression
Rule #1: The 10% Rule Never increase weight, repetitions, or training volume by more than 10% per week. This conservative approach allows connective tissues (tendons, ligaments) to adapt alongside muscles.
Rule #2: Pain is Not Gain Muscle fatigue and mild discomfort during the last few repetitions is normal. Sharp pain, joint discomfort, or pain that persists after exercise indicates a problem requiring modification or medical consultation.
Rule #3: Recovery is Non-Negotiable Older adults typically require 48-72 hours between strength training sessions targeting the same muscle groups. Muscles grow during rest, not during workouts.
Rule #4: Form Before Load Perfect technique with light resistance builds better strength and reduces injury risk compared to heavy weights with poor form.
Common Mistakes in Senior Fitness Programs
❌ Progressing too quickly: Enthusiasm often leads to overtraining and injury ❌ Skipping warm-ups: Cold muscles and joints are more injury-prone ❌ Holding breath during exercises: Proper breathing prevents blood pressure spikes ❌ Ignoring balance training: Strength without stability increases fall risk ❌ Training through pain: Distinguishing between discomfort and pain is critical ❌ Neglecting nutrition: Inadequate protein intake undermines strength gains
Balance and coordination: Reduced wobbling, improved stability
“The best exercise program is the one you’ll actually do consistently. Start where you are, use what you have, and do what you can.” — Arthur Ashe
Independence-Focused Strength: Training for Real Life
Functional Fitness: The Ultimate Goal
The most effective fitness programs for seniors prioritize functional strength—the ability to perform everyday activities with ease and confidence. Rather than focusing solely on isolated muscle groups, functional training emphasizes movement patterns used in daily life.
Key Functional Movement Patterns:
🏠 Squatting: Getting on/off toilet, picking up items from floor, gardening 🏠 Pushing: Opening heavy doors, getting up from bed, moving furniture 🏠 Pulling: Opening doors, retrieving items from shelves, yard work 🏠 Carrying: Groceries, laundry baskets, grandchildren 🏠 Rotating: Reaching behind, getting in/out of cars, household tasks 🏠 Balancing: Walking on uneven surfaces, preventing falls, stability
Essential Exercises for Daily Independence
1. Sit-to-Stand (Chair Squats) Builds leg strength for toilet use, car entry/exit, and rising from furniture
Sit in a sturdy chair with feet hip-width apart
Lean forward slightly and stand without using hands (if possible)
Lower back down with control
Progress: Hold weight at chest, use lower chair, increase repetitions
2. Step-Ups Improves stair climbing, curb navigation, and single-leg strength
Use a low, stable step (4-8 inches initially)
Step up with one foot, bring other foot to meet it
Step down with control
Progress: Increase step height, add weight, perform without handrail support
3. Farmer’s Carry Enhances grip strength and carrying capacity for groceries and daily items
Hold weights (dumbbells, water jugs, or bags) at sides
Walk with upright posture for 30-60 seconds
Maintain level shoulders and engaged core
Progress: Increase weight, distance, or duration
4. Standing Row (with Band) Strengthens back muscles for pulling, reaching, and posture
Secure resistance band at chest height
Pull band toward torso, squeezing shoulder blades together
Return to start with control
Progress: Use stronger band, increase repetitions, slow tempo
5. Modified Push-Ups Builds upper body strength for pushing up from bed or floor
Start with wall push-ups, progress to counter height
Eventually advance to knee push-ups, then full push-ups
Maintain straight line from head to knees/feet
Progress: Lower angle, increase repetitions, add pause at bottom
Balance Training: The Unsung Hero of Senior Fitness
Falls represent the leading cause of fatal and non-fatal injuries among older adults [15]. Balance training reduces fall risk while improving confidence and mobility.
Progressive Balance Exercises:
Level 1 (Beginner):
Standing on one foot while holding support (10-30 seconds each side)
Heel-to-toe walking along a line
Weight shifts side-to-side and forward-back
Level 2 (Intermediate):
Standing on one foot without support
Tandem stance (one foot directly in front of other)
Eyes-closed balance exercises
Level 3 (Advanced):
Single-leg exercises (reaches, squats)
Balance on unstable surfaces (foam pad, balance disc)
Dynamic balance challenges (catching/throwing while balancing)
The Mind-Muscle Connection
Effective fitness programs for seniors emphasize intentional movement—focusing mental attention on the muscles being worked. This mind-muscle connection:
Improves exercise effectiveness by 20-30% [16]
Enhances body awareness and coordination
Reduces injury risk through better movement control
Increases exercise engagement and enjoyment
Practice this by mentally “feeling” each muscle contract during exercises, moving deliberately rather than rushing through repetitions.
Nutrition Strategies to Support Strength Gains
Protein: The Building Block of Muscle
Older adults require more protein than younger individuals to maintain and build muscle mass—approximately 1.0-1.2 grams per kilogram of body weight daily [17]. For a 150-pound (68 kg) person, this equals 68-82 grams of protein daily.
High-Quality Protein Sources:
Lean meats (chicken, turkey, lean beef)
Fish (salmon, tuna, cod)
Eggs and egg whites
Greek yogurt and cottage cheese
Legumes (beans, lentils, chickpeas)
Protein supplements (whey, plant-based powders)
Protein Distribution Matters: Consume 20-30 grams of protein at each meal rather than concentrating intake at dinner. This distribution optimizes muscle protein synthesis throughout the day [18].
Hydration and Recovery
Adequate hydration supports:
Nutrient transport to muscles
Joint lubrication
Temperature regulation during exercise
Recovery and waste removal
Hydration Guidelines:
Drink 8-10 cups of water daily (more on exercise days)
Monitor urine color (pale yellow indicates good hydration)
Consume water before, during, and after workouts
Supplements Worth Considering
While whole foods should provide most nutrients, certain supplements benefit older adults engaged in strength training:
Vitamin D: Supports muscle function and bone health (many seniors are deficient)
Omega-3 fatty acids: Reduce inflammation and support recovery
Creatine monohydrate: Safely enhances strength gains in older adults [19]
Calcium: Supports bone density alongside strength training
Always consult healthcare providers before starting new supplements, especially if taking medications.
Creating Your Personalized Senior Fitness Program
12-Week Progressive Strength Plan
Weeks 1-4: Foundation Phase
Focus: Learning proper form, building exercise habit
Frequency: 2 days per week
Intensity: Bodyweight or very light resistance
Volume: 2 sets of 8-10 repetitions
Exercises: 6-8 basic movements covering all major muscle groups
Focus: Continued strength gains and functional capacity
Frequency: 3 days per week
Intensity: Moderate resistance with good form
Volume: 3 sets of 10-15 repetitions
Exercises: 10-12 movements with increased complexity
Sample Weekly Schedule (Weeks 9-12)
Monday: Lower Body & Core
Chair squats: 3 sets × 12 reps
Step-ups: 3 sets × 10 reps per leg
Standing calf raises: 3 sets × 15 reps
Seated marches with resistance: 3 sets × 20 reps
Standing side leg lifts: 2 sets × 12 reps per side
Wednesday: Upper Body & Balance
Wall or counter push-ups: 3 sets × 10 reps
Resistance band rows: 3 sets × 12 reps
Overhead press (light weights): 3 sets × 10 reps
Bicep curls: 3 sets × 12 reps
Single-leg balance holds: 3 sets × 30 seconds per leg
Friday: Full Body Functional
Farmer’s carries: 3 sets × 40 seconds
Deadlift (light weight or band): 3 sets × 10 reps
Chest press (bands or weights): 3 sets × 12 reps
Wood chops (rotational): 3 sets × 10 reps per side
Plank holds (modified as needed): 3 sets × 20-30 seconds
Adapting for Common Health Conditions
Arthritis:
Perform exercises during times of least pain/stiffness
Use resistance bands to reduce joint stress
Focus on full range of motion without forcing
Consider water-based resistance training
Osteoporosis:
Emphasize weight-bearing exercises
Avoid forward flexion (bending forward) under load
Include balance training to prevent falls
Progress resistance gradually
Heart Disease:
Obtain medical clearance before starting
Monitor heart rate and exertion levels
Avoid breath-holding (Valsalva maneuver)
Start very conservatively and progress slowly
Diabetes:
Monitor blood glucose before and after exercise
Keep fast-acting carbohydrates available
Exercise at consistent times relative to meals
Stay well-hydrated
Conclusion: Taking the First Step Toward Strength and Independence
Strength training represents one of the most powerful interventions available to older adults seeking to maintain independence, vitality, and quality of life well into their later years. The evidence is overwhelming: fitness programs for seniors that prioritize resistance training can reverse muscle loss, improve bone density, enhance balance, reduce chronic disease symptoms, and restore the physical capacity needed for daily activities.
The journey doesn’t require expensive gym memberships, complicated equipment, or hours of daily commitment. Starting with simple bodyweight exercises performed twice weekly, older adults can begin rebuilding strength immediately. As confidence and capacity grow, progression to resistance bands, light weights, and more challenging movements becomes natural and safe.
Your Action Plan for Starting Today:
Schedule a healthcare consultation to discuss your fitness goals and any medical considerations
Choose 4-6 basic exercises from the bodyweight movements described in this article
Set aside 15-20 minutes on two non-consecutive days this week
Perform 2 sets of 8-10 repetitions of each exercise, focusing on perfect form
Track your workouts in a simple notebook or smartphone app
Commit to 4 weeks of consistency before evaluating progress
Consider joining a class or working with a certified trainer specializing in senior fitness
Remember that every journey begins with a single step—or in this case, a single squat, push-up, or bicep curl. The strength you build today directly translates to independence tomorrow: carrying groceries without assistance, playing actively with grandchildren, traveling confidently, and maintaining the dignity of self-sufficiency.
Age is not a barrier to strength; inactivity is. The most effective fitness programs for seniors are those that begin today, progress safely, and continue consistently. Your stronger, more independent future is waiting—all you need to do is take that first step.
References
[1] Volpi, E., Nazemi, R., & Fujita, S. (2004). Muscle tissue changes with aging. Current Opinion in Clinical Nutrition and Metabolic Care, 7(4), 405-410.
[2] Cruz-Jentoft, A. J., et al. (2019). Sarcopenia: Revised European consensus on definition and diagnosis. Age and Ageing, 48(1), 16-31.
[3] Sherrington, C., et al. (2019). Exercise for preventing falls in older people living in the community. Cochrane Database of Systematic Reviews, 1, CD012424.
[4] Peterson, M. D., Sen, A., & Gordon, P. M. (2011). Influence of resistance exercise on lean body mass in aging adults: A meta-analysis. Medicine & Science in Sports & Exercise, 43(2), 249-258.
[5] Lexell, J. (1995). Human aging, muscle mass, and fiber type composition. The Journals of Gerontology Series A: Biological Sciences and Medical Sciences, 50, 11-16.
[6] Centers for Disease Control and Prevention. (2024). Facts About Falls. Retrieved from CDC.gov
[7] Fiatarone Singh, M. A., et al. (2014). The Study of Mental and Resistance Training (SMART) study—resistance training and/or cognitive training in mild cognitive impairment. Journal of the American Medical Directors Association, 15(12), 873-880.
[8] Westcott, W. L. (2012). Resistance training is medicine: Effects of strength training on health. Current Sports Medicine Reports, 11(4), 209-216.
[9] American College of Sports Medicine. (2009). Exercise and physical activity for older adults. Medicine & Science in Sports & Exercise, 41(7), 1510-1530.
[10] Hong, A. R., & Kim, S. W. (2018). Effects of resistance exercise on bone health. Endocrinology and Metabolism, 33(4), 435-444.
[11] Strasser, B., & Pesta, D. (2013). Resistance training for diabetes prevention and therapy. Experimental and Clinical Endocrinology & Diabetes, 121(08), 440-445.
[12] O’Connor, P. J., Herring, M. P., & Caravalho, A. (2010). Mental health benefits of strength training in adults. American Journal of Lifestyle Medicine, 4(5), 377-396.
[13] Granacher, U., et al. (2013). The importance of trunk muscle strength for balance, functional performance, and fall prevention in seniors. Sports Medicine, 43(7), 627-641.
[14] American College of Sports Medicine. (2026). ACSM’s Guidelines for Exercise Testing and Prescription (11th ed.). Wolters Kluwer.
[15] Bergen, G., Stevens, M. R., & Burns, E. R. (2016). Falls and fall injuries among adults aged ≥65 years—United States, 2014. Morbidity and Mortality Weekly Report, 65(37), 993-998.
[16] Calatayud, J., et al. (2016). Importance of mind-muscle connection during progressive resistance training. European Journal of Applied Physiology, 116(3), 527-533.
[17] Bauer, J., et al. (2013). Evidence-based recommendations for optimal dietary protein intake in older people. Journal of the American Medical Directors Association, 14(8), 542-559.
[18] Mamerow, M. M., et al. (2014). Dietary protein distribution positively influences 24-h muscle protein synthesis in healthy adults. The Journal of Nutrition, 144(6), 876-880.
[19] Candow, D. G., et al. (2014). Effectiveness of creatine supplementation and resistance training on muscle strength and muscle mass in older adults. Journal of Strength and Conditioning Research, 28(6), 1747-1755.
TMG’s Role in Enhancing Muscle, Reducing Fat, and Promoting Longevity
In the quest for optimal health, longevity, and a physique that reflects our fitness aspirations, the supplement industry offers a myriad of options. Among these, one compound stands out not only for its body composition benefits but also for its potential to enhance longevity. This compound is TMG (trimethylglycine), also known as betaine, a nutrient that the body can produce and is also found in certain foods. However, to achieve the amounts necessary for significant health benefits, supplementation is often recommended.
What is TMG?
TMG is a methylated derivative of the amino acid glycine. In simpler terms, it’s glycine with three additional methyl groups. This might sound complex, but the process of methylation plays a crucial role in our body. It involves the donation of methyl groups to various processes, such as DNA repair, detoxification, and the expression of genes. TMG, as a potent methyl donor, supports these essential functions, facilitating a balance between methylation and demethylation, processes that are critical for cellular activity, healthy aging, muscle development, and fat metabolism.
TMG’s Impact on Body Composition
Fat Loss
Research, including a significant meta-analysis published in the journal Nutrients, sheds light on TMG’s impressive capacity to reduce fat mass and body fat percentage without affecting overall body weight or BMI. This indicates that TMG aids in fat loss while preserving muscle mass, a dual action that is typically only attributed to the use of performance-enhancing drugs.
Muscle Building
TMG’s benefits extend into muscle building. Studies have shown that individuals supplementing with TMG experience an increase in muscle mass. Remarkably, this increase does not come with the water weight gain often associated with muscle-enhancing supplements or steroids, suggesting TMG’s unique mechanism of action that promotes lean muscle growth.
Mechanisms Behind TMG’s Effects
The mechanisms through which TMG exerts its effects are multifaceted:
Inhibition of White Fat Production: TMG has been shown to inhibit the production of white fat, the type of fat we typically aim to reduce, through enhanced mitochondrial biogenesis and increased thermogenesis from brown fat.
Reduction in Fatty Acid Synthesis in Muscle: This leads to less fat accumulation within the muscles, contributing to a leaner body composition.
Decrease in Insulin Resistance: By improving insulin sensitivity, TMG facilitates better muscle protein synthesis, further aiding in muscle building and fat loss.
TMG for Longevity and Health
Beyond its body composition benefits, TMG stands out for its role in enhancing longevity. High homocysteine levels have been linked to an increased risk of various diseases, and TMG has been proven to significantly lower homocysteine levels. Furthermore, TMG serves as a counterbalance to potential methyl pool depletion caused by NAD+ boosting supplements like NMN, ensuring a healthy balance of cellular processes essential for aging.
Practical Tips for TMG Supplementation
When considering TMG supplementation, the following tips can be helpful:
Recommended Doses: For fat loss and muscle building, doses range from 2.5g to 6g per day. For longevity and reducing homocysteine levels, lower doses may still be effective.
Choosing TMG Supplements: Look for reputable brands and consider products that combine TMG with other synergistic nutrients for optimal health benefits.
Dietary Sources: Include beets, shrimp, spinach, and wheat bran in your diet as natural sources of TMG.
Food Source
TMG Content (mg per 100g)
Wheat Bran
1300+
Beets
200
Shrimp
Varies
Spinach
Varies
Conclusion
TMG offers a compelling combination of benefits for those looking to improve their body composition and invest in their long-term health. By supporting fat loss, muscle growth, and cellular functions related to longevity, TMG supplementation can be a valuable addition to your wellness regimen.
Call to Action
We encourage readers to share their experiences with TMG supplementation or to consider trying it as part of their health and fitness journey. Don’t forget to take advantage of the Thrive Market offer to explore the benefits of TMG and other healthful products. Together, let’s strive for optimal health, longevity, and a physique that reflects our hard work and dedication.
Elevate Your Leg Training with the Perfect PPL Leg Workout
Background on the PPL Split Routine
Before we delve into the details of the leg workout, it’s important to understand the concept behind the Push, Pull, Legs (PPL) split routine. The PPL split routine is a highly effective training approach that divides workouts into three distinct categories: push exercises, pull exercises, and leg exercises. This division allows for focused training of specific muscle groups while providing ample rest and recovery time. By targeting different muscle groups on different days, the PPL split routine promotes optimal muscle growth and strength development. Today, we will focus on the leg workout, which completes the PPL series.
Overview of the Leg Workout
The perfect leg workout is designed with hypertrophy (muscle growth) as the primary goal. It incorporates a range of exercises that target various muscles in the legs and posterior chain. The workout emphasizes progressive overload, proper form, and targeted muscle engagement to maximize results. Now, let’s take a closer look at each exercise included in this leg workout.
Exercise 1: Barbell Squats
Barbell Squats are considered a cornerstone exercise for leg development. They engage multiple muscle groups, including the quadriceps, hamstrings, glutes, and core. To perform Barbell Squats, place a barbell across your upper back and shoulders, descend into a deep squat position, and then return to a standing position. This compound movement builds overall leg strength and size. The recommended protocol for Barbell Squats in this workout is to perform four sets of four to six repetitions. It’s essential to choose a weight that allows you to complete the desired rep range while leaving one or two reps in the tank.
Exercise 2: Barbell Hip Thrusts
Barbell Hip Thrusts are an excellent exercise for targeting the glutes and hamstrings. This exercise helps develop the posterior chain while minimizing stress on the lower back. To perform Barbell Hip Thrusts, sit on the ground with your upper back against a bench, place a barbell across your hips, and drive through your heels to lift your hips off the ground. Focus on squeezing the glutes at the top of the movement. The recommended protocol for Barbell Hip Thrusts in this workout is three sets of eight to ten repetitions.
Exercise 3: Dumbbell/Barbell Reverse Lunges
Dumbbell/Barbell Reverse Lunges are a fantastic way to target the anterior chain and enhance overall leg strength and stability. This exercise requires stepping back into a lunge position and then returning to a standing position. The reverse lunge variation places less stress on the knees and provides a unique challenge to the muscles of the legs and core. To perform Dumbbell/Barbell Reverse Lunges, hold a dumbbell or barbell in each hand, step back with one leg, lower your body until the back knee is just above the ground, and then push through the front heel to return to the starting position. Aim for two to three sets of ten to twelve repetitions per leg.
Exercise 4: Dumbbell Single Leg ADL/Slick Floor Bridge Curl (Rotation)
The fourth exercise in the perfect leg workout introduces the concept of exercise rotation. In this workout, you have the option to alternate between two exercises: Dumbbell Single Leg ADL and Slick Floor Bridge Curl. These exercises primarily target the hamstrings and glutes while challenging stability and core engagement.
Dumbbell Single Leg ADL is a variation of the Romanian Deadlift (RDL) that helps isolate the hamstrings and promotes unilateral leg development. To perform Dumbbell Single Leg ADL, hold a dumbbell in one hand, lift the opposite leg off the ground, hinge at the hips, and lower the dumbbell while keeping the back straight. Focus on engaging the glutes and hamstrings throughout the movement. Aim for two to three sets of ten to twelve repetitions per leg.
The alternative exercise, Slick Floor Bridge Curl, is a unique exercise that targets the hamstrings and glutes. It involves lying on the floor with your feet on a slick surface, such as a hardwood floor, and curling your legs toward your glutes by driving through the heels and engaging the hamstrings. This exercise offers the advantage of a closed-chain movement, reducing stress on the lower back. Again, aim for two to three sets of ten to twelve repetitions.
The final exercise in the perfect leg workout focuses on calf development. Strong and well-defined calves add balance and aesthetic appeal to the legs. In this workout, you have the option to choose between two variations: Standing Dumbbell Calf Raises and Seated Dumbbell Calf Raises. Each variation targets different muscles within the calf complex, providing a comprehensive calf training experience.
Standing Dumbbell Calf Raises primarily target the gastrocnemius, the larger calf muscle responsible for the visible bulge in the lower leg. To perform Standing Dumbbell Calf Raises, stand on the edge of a step or platform with your heels hanging off the edge, hold dumbbells in your hands, and rise up onto your toes, then lower your heels below the step to stretch the calves. Aim for three sets of fifteen to twenty repetitions.
Seated Dumbbell Calf Raises shift the focus to the soleus, a deeper calf muscle responsible for ankle flexion. This exercise is performed while sitting on a bench or chair, with dumbbells placed on your thighs. By pressing through the balls of your feet, raise your heels as high as possible, and then lower them back down. The recommended protocol for Seated Dumbbell Calf Raises is also three sets of fifteen to twenty repetitions.
Conclusion and Final Thoughts
In conclusion, the perfect leg workout provides a comprehensive training routine that targets all major muscle groups in the legs and posterior chain. Incorporating exercises like Barbell Squats, Barbell Hip Thrusts, Dumbbell/Barbell Reverse Lunges, Dumbbell Single Leg ADL/Slick Floor Bridge Curl, and Standing/Seated Dumbbell Calf Raises, this workout is designed to promote hypertrophy and functional leg development. Remember to prioritize proper form, progressive overload, and consistency in your training to achieve the best results.
By following the recommendations provided in this leg workout, you can take your leg training to the next level. Whether your goal is building strength, enhancing athletic performance, or achieving a well-defined lower body, the perfect leg workout has got you covered. Incorporate this workout into your training routine, stay dedicated, and watch your legs transform.
Maximizing Muscle Growth: Unveiling the Perfect Pull Workout – Part 1 and Part 2 in the Push-Pull Legs Split
Introduction
Welcome to the ultimate guide to the perfect Pull workout as part of the Push-Pull Legs (PPL) Split. This workout series, by popular demand, focuses on hypertrophy and muscle building. In this comprehensive guide, we will delve into the Pull portion of the PPL Split, breaking down each exercise, set, and rep to ensure you have all the tools you need to achieve the gains you desire.
The Pull Workout: Part 1
Now, let’s explore the first part of the Pull workout, which serves as the foundation for building a well-rounded back and bicep strength.
Exercise 1: Deadlifts
The Pull workout begins with the deadlift, a compound lift that engages multiple muscle groups. To perform the deadlift properly, start with warm-up sets and gradually increase the weight. Aim to reach 80% of your one-rep max for a challenging set of five reps. Progression is key, so increase the weight in subsequent sessions if you successfully complete the five reps.
Exercise 2: Chest Supported Rows
Following the deadlift, we transition to chest supported rows. This exercise not only targets the lats but also offers relief for the lower back. Performing three sets of eight to ten reps allows you to focus on strengthening your upper back, an often neglected area. Remember, maintaining proper form is crucial for maximizing results.
Exercise 3: Dumbbell Pullovers
Moving on, we introduce the dumbbell pullover exercise, known as the “squat of the upper body” according to Arnold Schwarzenegger. By initiating the movement with the lats, this exercise effectively targets and builds the lat muscles. Performing two to three sets in the 10 to 12 rep range, with the appropriate weight, ensures muscle failure within the desired range.
Exercise 4: Dumbbell High Pulls
To further work the upper back and develop the rear delts and upper traps, we incorporate the dumbbell high pull. Although it may resemble an upright row, it differs in terms of shoulder mechanics, making it safer and more effective. By emphasizing vertical pulling, this exercise helps balance out the overall back development.
Exercise 5: Bicep Chin Curls
Addressing the biceps, we introduce the bicep chin curl. It is important to include direct bicep work in a hypertrophy-focused split. This exercise mimics the mechanics of a barbell curl, providing an effective stimulus for bicep growth. Performing three sets to failure, combined with a tricep exercise, ensures balanced arm development.
Exercise 6: Tricep Extensions
To complement the bicep chin curls, we incorporate tricep extensions. This exercise focuses on the long head of the triceps, an often overlooked area. By utilizing a stress position, we aim for three sets to failure, ensuring maximum tricep engagement and hypertrophy.
Corrective Work: Angel and Devil Exercise
No pull workout is complete without some additional corrective work. The Angel and Devil exercise engages the entire posterior chain, activating the lower back, lower traps, upper back, and paraspinal muscles. Performing three sets of 15 to 20 quality reps allows you to target these crucial muscle groups effectively.
The Pull Workout: Part 2
Now, let’s explore the second part of the Pull workout, designed to complement Part 1 while offering its own unique benefits.
Exercise 1: Snatch Grip Deadlifts
Part 2 commences with snatch grip deadlifts, focusing on reinforcing the hinge pattern. This exercise offers benefits for the upper back, particularly the upper traps, while also providing additional grip strength training. Aim for three sets of five reps with a weight that allows for approximately eight reps, focusing on volume rather than maximal strength.
Exercise 2: Weighted Pull-Ups
Following the snatch grip deadlifts, we move on to weighted pull-ups. This compound exercise enhances overall pulling strength and targets the lats effectively. To ensure sufficient challenge, aim for six to eight reps per set. If you can perform more, incorporate additional weight to stay within the desired rep range.
Exercise 3: Dumbbell Gorilla Rows
To add variety to the workout, we introduce the dumbbell gorilla row as an alternative to the traditional dumbbell one-arm row. This exercise allows for a balanced and grounded position, minimizing the risk of injury. Adjusting your elbow position can shift the focus from the flat back to the upper back, providing the opportunity for further muscle development.
Exercise 4: Straight Arm Pushdowns
The straight arm pushdown exercise targets the lats while focusing on scapular strength. By extending the range of motion from the previous dumbbell pullover exercise, we achieve complete adduction of the lats, promoting hypertrophy. Aim for two to three sets of 12 to 15 reps to optimize muscle engagement.
Exercise 5: Barbell Curls
To continue working on bicep development, we incorporate the classic barbell curl. This exercise allows for heavier weights and promotes strength and size gains. Aim for six to eight reps per set, challenging yourself with appropriate weight to stimulate bicep growth effectively.
Exercise 6: Tricep Pushdowns
Supersetting the barbell curls, we move on to tricep exercises with tricep pushdowns. This exercise specifically targets the lateral and medial heads of the triceps, providing a well-rounded arm workout. Aim for three sets of 10 to 12 reps to ensure optimal tricep development.
Corrective Work: Face Pulls
The final exercise of the Pull workout is the face pull, which targets the upper back, midscapular muscles, and rotator cuff. This exercise serves as a crucial component for overall shoulder health and upper back development. Focus on performing 15 to 20 quality reps, emphasizing form and muscle activation.
Maximizing Muscle Growth and Strength with the Perfect Push Workout: A Comprehensive Guide to the Push | Pull | Legs (PPL) Split series by Jeff Cavaliere
When we look at creating a perfect workout, no matter what it is, you have to understand there’s a lot of selections that go into that. I’m making my bold selections here and putting them into this workout for a reason because I believe it’s going to work to help you to build muscle. That being said guys, I want to break it down for you step-by-step and show you not just what we’re picking, but why we’re picking it so you can get the gains that you’re looking for.
Understanding the PPL Split
Before we dive into the details of the perfect push workout, let’s first understand the Push | Pull | Legs (PPL) split. This split is a popular and effective way of organizing workout routines. It involves dividing your training sessions into three main categories: push, pull, and legs.
On the push day, you focus on training the pushing muscles, which primarily include the triceps, shoulders, and chest. By dedicating a specific day to these muscles, you can ensure they receive proper attention and stimulation for growth and development.
The perfect push workout we’ll be discussing today is part of the PPL series, which means it complements the pull and legs workouts. This split allows for balanced and comprehensive training of all major muscle groups, leading to overall strength and physique improvements.
The PPL Split and Training Frequency
Day
Monday
Tuesday
Wednesday
Thursday
Friday
Saturday
Sunday
Option A
Pull
Push
Legs
Pull
Push
Legs
OFF
Option B
Pull
Push
Legs
OFF
Pull
Push
Legs
Option C (Asynchronous Split)
OFF
Pull
Push
Legs
OFF
Pull
Push
This weekly chart provides a structured plan for your training routine. It ensures that each major muscle group is targeted with adequate rest days in between to promote recovery and growth. Remember to adjust the sets, reps, and exercises according to your fitness level and goals. Stay consistent and enjoy your workouts!
Now that we have a comprehensive understanding of the perfect push workout, let’s take a moment to discuss the PPL split and training frequency options. The PPL split allows for organized and balanced training of all major muscle groups throughout the week.
In the PPL split, you have the option to follow a six-day training cycle, where you repeat the push, pull, and legs workouts for six consecutive days before taking a day off. This approach provides consistent stimulation to the muscles, promoting growth and progress.
Alternatively, you can opt for the asynchronous split, which involves incorporating rest days between the push, pull, and legs workouts. This split allows for more frequent rest and recovery, which can be beneficial for muscle growth and reducing the risk of overtraining.
The asynchronous split, as mentioned earlier, provides an additional rest day between each workout. For example, you can perform the push workout on day one, followed by a rest day on day two. Then, proceed with the pull workout on day three, followed by another rest day on day four. Finally, perform the leg workout on day five, followed by a rest day on day six. This pattern repeats for subsequent weeks.
While the asynchronous split may introduce an unpredictable off day, the additional rest days allow for enhanced recovery, potentially leading to better muscle growth and overall performance. However, it’s important to note that individual preferences and training goals may vary, so choose the frequency that suits your needs and allows for adequate recovery.
The Perfect Push Workout: Push One
Now, let’s dive into the details of the perfect push workout. We have carefully selected a set of exercises that target the triceps, shoulders, and chest to maximize muscle growth. In Push One, we will cover six exercises that work synergistically to help you achieve the desired results. Let’s explore each exercise in detail:
Exercise 1: Barbell Bench Press
The Barbell Bench Press is a classic exercise that forms the cornerstone of any effective push routine. It is an excellent compound movement that builds strength and muscle mass in the triceps, shoulders, and chest. When performing the Barbell Bench Press, aim for four sets of four to six reps. This rep range allows for sufficient intensity without pushing yourself to failure. Keep in mind that as fatigue sets in, you may need to adjust the weights to maintain proper form and stay within the prescribed rep range.
Exercise 2: Hi-to-Low Crossover
To complement the Barbell Bench Press, we incorporate the Hi-to-Low Crossover. This exercise provides a unique opportunity to fully contract the chest by bringing the arm across the body. By performing the crossover in a high-to-low motion, we target the lower chest fibers, particularly the abdominal fibers. Additionally, this exercise promotes full adduction of the hand across the chest, making it an effective hypertrophy exercise. Aim for three sets of 10 to 12 reps to maximize the benefits of this exercise.
Exercise 3: Dumbbell Shoulder Press
Shifting our focus to the shoulders, we introduce the Dumbbell Shoulder Press. While the barbell variation is a viable option, we prefer the Dumbbell Shoulder Press for this workout. Performing the exercise in a standing position, as opposed to a seated position, allows for better shoulder mechanics and avoids unnecessary restrictions caused by pushing the scapula back into the bench. Aim for four sets of 8 to 10 reps, slightly higher than the previous exercise, to stimulate muscle growth in the shoulders.
Exercise 4: 1 1/2 Side Lateral Raise
Next on our list is the 1 1/2 Side Lateral Raise, an exercise that specifically targets the middle deltoid. This exercise emphasizes hypertrophy by increasing the time under tension. The technique involves taking the weight up fully, coming down halfway, and then returning to the top position. By eliminating momentum and focusing on controlled contractions, we effectively engage the targeted muscle. Perform three sets of 12 to 15 reps to optimize the benefits of this exercise.
Exercise 5: Tricep and Bicep Superset
In this superset, we incorporate a tricep exercise alongside a bicep exercise, offering additional volume for both muscle groups without interfering with the primary push exercises. The first exercise is the Lying Tricep Extension, which primarily targets the long head of the triceps. Aim for three sets of 10 to 12 reps, taking the exercise to failure. Immediately following the tricep extension, move on to the Dumbbell Waiter’s Curl. This exercise provides a challenging workout for the biceps while maintaining a balance within the push routine. Perform three sets of 10 to 12 reps for both exercises.
Exercise 6: Rotator Cuff External Rotation
To complete the push workout, we need to pay attention to proper shoulder function and stability. The Rotator Cuff External Rotation exercise serves as a corrective exercise to strengthen the rotator cuff muscles and promote healthy shoulder movement. This exercise is simple yet crucial for preventing imbalances caused by the internal rotation involved in push workouts. Perform three sets of 15 to 20 reps with a resistance band to ensure proper activation of the external rotators.
Transition and Recap
Congratulations on completing the first push workout! Before moving on, let’s recap the exercises covered:
Exercise
Sets and Reps
Barbell Bench Press
4 sets of 4-6 reps
Hi-to-Low Crossover
3 sets of 10-12 reps
Dumbbell Shoulder Press
4 sets of 8-10 reps
1 1/2 Side Lateral Raise
3 sets of 12-15 reps
Tricep and Bicep Superset
3 sets of 10-12 reps (each exercise)
Rotator Cuff External Rotation
3 sets of 15-20 reps
Now that we have covered the first push workout in detail, it’s time to transition to the second push workout. In the next section, we will explore a new set of exercises designed to complement and build upon the foundation laid in the first workout. Stay tuned for an invigorating continuation of your push routine.
The Perfect Push Workout: Push Two
Exercise 1: Overhead Barbell Press
We begin Push Two with the Overhead Barbell Press. This exercise serves as a compound movement that focuses on building strength and driving hypertrophy in the triceps, shoulders, and chest. The Overhead Barbell Press allows for a greater load to be used compared to its dumbbell counterpart. Aim for four sets of four to six reps, leaving one to two reps in the tank. This rep range ensures sufficient intensity while avoiding failure. As you progress, remember to adjust the weights accordingly to maintain proper form and stay within the recommended rep range.
Exercise 2: Dumbbell Underhand Bench Press
Moving on to the next exercise, we introduce the Dumbbell Underhand Bench Press. This variation specifically targets the upper chest while reducing stress on the shoulders compared to the Incline Dumbbell Bench Press. Performing the exercise with an underhand grip engages the upper chest muscles effectively. Aim for four sets of eight to ten reps to optimize muscle growth in this area. Remember to maintain stability and control throughout the movement, focusing on the mind-muscle connection.
Exercise 3: Abduction Row
Now, we introduce a unique inclusion in the push workout—Abduction Row. Traditionally considered a pulling exercise, this movement is strategically incorporated on push day to target the middle and rear deltoids while offsetting accumulated fatigue. The Abduction Row involves driving the arm back and out, focusing on scapular abduction. Perform three sets of eight to ten reps, ensuring proper scapular control and tension in the targeted muscles. Maintain a slight forward lean to maximize the activation of the middle and rear deltoids.
Exercise 4: Dumbbell Floor Fly
The Dumbbell Floor Fly takes center stage in this push workout. This exercise offers several advantages over the unsupported version, providing a safer and more controlled environment. By performing the exercise on the floor, we ensure that the anterior shoulder capsule is not overextended, reducing the risk of injury. The Dumbbell Floor Fly also allows for eccentric overload, a key driver of hypertrophy. Aim for three sets of ten to twelve reps, focusing on a controlled range of motion and tempo throughout the exercise.
Exercise 5: Tricep and Bicep Superset (Heavier Focus)
Next, we delve into a superset that places a heavier focus on tricep and bicep exercises, allowing for additional volume and strength development. The first exercise in this superset is the Close Grip Bench Press. By narrowing the grip, we target the medial and lateral heads of the triceps, promoting their growth and strength. Perform three sets of six to eight reps, gradually increasing the weights as you progress. Immediately after each set of Close Grip Bench Press, move on to a dumbbell curl exercise of your choice. Select a weight that allows for three sets of ten to twelve reps, focusing on quality contractions and controlled movements.
Exercise 6: Pushup Plus
To conclude Push Two, we introduce the Pushup Plus exercise. This exercise serves a dual purpose—it enhances scapular control and provides additional stimulation to the chest muscles. Start in a pushup position and proceed to push through as hard as you can, allowing your shoulder blades to wrap around your body into protraction. This movement engages the serratus anterior muscles and promotes stability. Perform three sets to failure, focusing on proper mechanics and maintaining tension throughout the exercise.
Transition and Recap
Congratulations on completing the second push workout! Before moving on, let’s recap the exercises covered:
Exercise
Sets and Reps
Overhead Barbell Press
4 sets of 4-6 reps
Dumbbell Underhand Bench Press
4 sets of 8-10 reps
Abduction Row
3 sets of 8-10 reps
Dumbbell Floor Fly
3 sets of 10-12 reps
Tricep and Bicep Superset
– Close Grip Bench Press
3 sets of 6-8 reps
– Dumbbell Curl
3 sets of 10-12 reps
Pushup Plus
3 sets to failure
These exercises are part of the Push Two workout and aim to target the triceps, shoulders, and chest while promoting muscle growth and strength.
Unleash Your Sleeve-Filling Potential: A Comprehensive Guide by Fitness expert Jeff Cavaliere
Did you know that the average medium-sized T-shirt has a 4.6 inch diameter sleeve? That means you need a minimum of a 14-inch unflexed arm to fill it! And if you’re wearing a large or XL shirt, you’ll need even bigger arms to prevent that ugly bagginess.
If you’re tired of your shirts looking too loose and you want to change the way your arms look, it’s time to revolutionize your arm training. In this article, I will guide you through five essential steps to transform the effectiveness of your biceps and triceps workouts, ensuring bigger and more impressive arms in just 30 days. And to make it even better, I’ll provide you with a step-by-step routine that removes all the guesswork. Let’s dive in!
Step 1: Understanding the Sleeve-Filling Requirement
Before we delve into the specific steps, it’s crucial to understand the sleeve-filling requirement. You need to measure your arm size accurately to determine the minimum size needed to fill different shirt sizes. For example, a medium-sized shirt requires a 14-inch unflexed arm, while a large size necessitates a 15-inch unflexed arm. If you’re sporting an XL shirt, you’ll need almost 16-inch arms to avoid baggy sleeves.
Knowing these measurements gives you a clear goal to work towards. So grab a measuring tape and find out your current arm size. This way, you can track your progress and ensure you’re on the right path to achieving sleeve-filling arms.
Step 2: Avoiding the 5 Big Mistakes in Arm Training
To see significant gains in arm size, it’s crucial to address the common mistakes many people make in their biceps and triceps training. One of the most critical points to understand is that building arm strength alone won’t necessarily lead to bigger arms. While strength is important, it’s equally vital to intensify your arm workouts.
Instead of focusing solely on the weight you’re lifting, emphasize taking your sets to failure. Push yourself beyond your limits, using techniques like drop sets, run the rack, and mechanical drop sets. By taking each set to the point of failure and even beyond, you’ll maximize the effectiveness of your workouts and experience substantial gains in arm size.
Step 3: Eccentric Overload for Muscle Growth
Now let’s discuss the power of eccentric overload, a concept that can revolutionize your arm training. Eccentric overload refers to emphasizing the lowering phase of each repetition. By slowing down and controlling the lowering portion, you provide additional tension and stress to your muscles, leading to greater muscle growth.
Contrary to popular belief, controlled eccentric movements are incredibly safe when performed correctly. For example, in a lying tricep extension, you can enjoy a slow eccentric movement on the way down and safely drop the weight behind you if needed. Applying eccentric overload stretches and damages the muscles, stimulating them to grow back stronger and bigger.
To incorporate eccentric overload into your arm training, choose exercises that allow you to focus on the eccentric portion. This can include exercises like dumbbell curls, tricep pushdowns, or skull crushers. Remember, controlling the eccentric phase is key to maximizing muscle growth and achieving those coveted bigger arms.
Step 4: Don’t Forget the Brachialis Muscle
When it comes to arm training, many people solely focus on their biceps and neglect an essential muscle—the brachialis. The brachialis is a separate muscle located beneath the biceps, and developing it is crucial for achieving maximum arm size.
The brachialis plays a vital role in pushing up the biceps, contributing to the peak and overall width of the arm. If you want those shirt sleeves to be filled out properly, it’s time to incorporate brachialis exercises into your routine. Sprinkling in the occasional brachialis exercise won’t be sufficient; you need to make it a consistent part of your arm training.
To target the brachialis effectively, consider exercises like hammer curls or reverse curls. These movements isolate the brachialis and provide the stimulus necessary for its growth. By incorporating specific exercises that focus on the brachialis, you’ll achieve not only impressive bicep size but also enhanced arm width and fullness.
Step 5: Maximizing Tricep Growth
While biceps often steal the spotlight, neglecting your triceps can hinder your progress towards bigger arms. The triceps play a significant role in arm size and shape, and it’s crucial to provide them with dedicated training for optimal growth.
Although triceps receive indirect work from chest and shoulder exercises, direct tricep training is necessary to achieve maximum growth. While the triceps have the capacity to handle more volume than the biceps, adjustments in training need to be made to stimulate their growth effectively.
Incorporating bodyweight exercises can be an excellent way to maximize tricep growth. Push-ups, bench dips, and tricep extensions can significantly increase tricep volume and provide a different stimulus compared to traditional weightlifting exercises. These exercises can target different heads of the triceps and help achieve a more complete contraction or stretch.
Remember, high repetition ranges combined with proper form and intensity are key to maximizing tricep growth. Don’t be afraid to push yourself to failure during these exercises, as metabolic fatigue and intensity are crucial for hypertrophy gains.
Step-by-Step 30-Day Plan for Bigger Arms
Now that we’ve covered the essential steps to bigger arms, let’s put it all together into a comprehensive 30-day plan. This plan will guide you through specific workouts for biceps, triceps, and what we’ll call the “missing pieces” to ensure a well-rounded approach to arm training.
Biceps Workout:
Incorporate exercises that emphasize intensity and eccentric overload. Perform exercises like incline dumbbell curls, concentration curls, or preacher curls. Use techniques such as drop sets, mechanical drop sets, or 21s to maximize the effectiveness of your sets. Aim for 3-4 sets per exercise, targeting the biceps from various angles.
1A. DB Incline curls x 5 reps (20 seconds)
1B. Seated DB curls x 5 Reps (20 seconds)
1C. DB drag curls X 5 Reps (20 seconds)
Triceps Workout:
Focus on exercises that maximize the contraction and extension of the triceps. Include exercises like lying dumbbell extensions, tricep pushdowns, or dips. Utilize techniques like 21s to divide the range of motion into different sections. Perform 3-4 sets per exercise, aiming for a complete triceps workout.
1A. DB Incline extensions x 21*
1B. Incline DB kickbacks x 1 minute
1C. Eccentric only DB skull crushers x 1 minute
*Performed in 21 style (7 top rom/ 7 bottom rom/ 7 full rom
Missing Pieces Workout:
Incorporate exercises that target the brachialis and other supporting muscles. Include hammer curls, reverse curls, or brachialis-specific exercises. Perform 2-3 sets of brachialis exercises, ensuring a proper stimulus for growth.
Bodyweight triceps variation – 2-3 x F
Hammer curl variation – 3-4 x 10-12 rep failure
Conclusion
By following these five steps and implementing the 30-day plan, you are guaranteed to see noticeable gains in your arm size. Remember, consistency and dedication are key to achieving your desired results. Measure your progress, track your arm size, and continue to challenge yourself throughout the process.
Say goodbye to loose shirt sleeves and hello to sleeve-filling arms. With proper arm training techniques, you’ll achieve the impressive arm size you’ve always desired. So, roll up your sleeves, commit to the journey, and get ready to showcase your bigger and stronger arms to the world!